|
As of late I've really been changing up my products but more improtantly adding products to my skin care routine. I'll be 29 next month so I really wanted to be more aggressive with my skin care. Which before was:
In the mornings: eye cream moisuturizer maybe some rose water spray At night: Cleanser w/ Foreo Luna Antioxidant Soothing Spray/Toner Night cream or sleeping facial Now my morning routine includes: Cleansing or Bioderma at least Spray Toner Vitamin C Serum Anti Oxidant Oil/Serum Sunscreen My night time is: Foreo Luna with cleanser Rosewater spray/toner Lactic Acid lotion a gentle retinol antioxidant oil CoQ10 night cream I've added in quite a bit and also taken out most things that have "fragrance (parfum)/perfume" listed in the ingredient deck. Now that won't always be the case since I review a lot of skin care for my blog but in general day to day this is how I choose to do my skin care right now. Also I've added in some different steps that I don't do every night, one being microdermabrasion (at home with the PMD) and the second being facial massage which is why we're here. I wanted to talk about facial massage because I find it quite interesting. So facial massage is nothing new it's been around for what seems like ever. It was introduced into the US in the 19th century. Some of you may have heard of it by the term "Face Yoga". Anyway, facial massage has several benefits. Instant face lift being one of those. If you're applying your moisturizer the way you've been taught or instructed, then you know to always work products into the skin in an upward motion. So you're already doing a form of facial massage right there. We go upwards because gravity naturally makes the skin sag over time and this keeps it lifted for longer or at the very least we aren't helping gravity any by pulling it downward. I personally like facial massage for the fact that it helps get extra fluid (which is what makes your face look puffy) out. So your face looks slimmer working that extra fluid out of the muscles in the face. So what I mean by that is you have a lot of lymph nodes around the face right under the jaw and chin. They have what is called "lymph fluid" which is a fluid that moves through the muscles and eliminates toxins. Without it the toxins build up. There has to be muscle movement for the "lymph fluid" to travel into the lymph nodes and thus get filtered into the blood stream which then eliminates the toxins in the body. Along with eliminating toxins, regular facial massage brings in oxygen to the muscles which has an anti aging advntage. Along with that, it increases blood flow to those muscles and helps produce collagen and boost your glow. So for those reason's alone it's good enough to convince me. Along with those major benefits, if you happen to be majorly stressed (who isn't these days) facial massage can not only help the tension and help you relax, but can help smooth lines in your forehead. You know when you get stressed or angry and you furrow your brows and you get those lines. Then the lines decide to become more prominent due to constant stress. Regular facial massage eases the muscles that are tense and tight while also flattening those lines and lessening the appearance of them. Now before you cut loose on massaging your face there's some points to remember: Use an oil or moisturizer to not cause irritation or pulling of the skin. Don't massage your face if your skin has irriations on it already, just let it rest. Make sure your hands are clean. Drink plenty of water. Depending on your skin type, age and so on you may only need to do facial massage once a month or every 2 weeks. I personally do a little bit everyday when I'm applying my oils at night or moisturizer in the morning. I really like doing it in the morning. I just use massage techniques to work products into the skin and I focus somewhat on the areas that help push out toxins so that my face looks less puffy and slimmer. I do the full sha-bang probably every two weeks which includes the tapping, the temple massage, the forehead and sinus area. Which actually is another great thing, if you have some congestion you can massage the sinus area to hopefully help move some of that congestion out. Of course talk with a doctor as well, since you may need antibiotics if it's a sinus infection. I use a medium to harder pressure when I work on the areas that can eliminate toxins. I don't hurt myself mind you but I make sure to use a pretty decent pressure so I'm really working and kneading those muscles. Also I find that it's the best way to get the most out of my skin care products. I use them during my facial massage so I'm getting the added benefits of the massage and then also making sure my skin care if really being pushed and absorbed into the skin and not just sitting on top of it, feeling heavy and weird. Now I'm not going to begin to try and explain in words how to massage your face correctly so I'm going to insert some links for tutorials for you to watch that might be helpful. Which is what I done. This is a cool video of a Celebrity Aesthetician (Nerida Joy) that shows different techniques of facial massage. She has plenty of other videos as well. I like how she explains things and busts some myths. I actually go by this detoxing and stimulating DIY at home facial massage (Facial Yoga) video by Annie Jaffrey. She clearly states that she isn't an expert so keep that in mind. but I think she does a really good job and I use her techniques very often. I really like watching her video because it's easier for me to mirror or replicate the same moves she does on her own face, rather than watching it being done to someone who is lying down. If that makes any sense at all. I'm also going to leave some articles that will tell you more about facial massage if you want to learn more. InStyle Magazine http://www.instyle.com/beauty/facial-massage-better-skin Reader's Digest http://www.rd.com/health/beauty/benefits-of-massage/ Livestrong http://www.livestrong.com/article/95793-benefits-facial-massage/
0 Comments
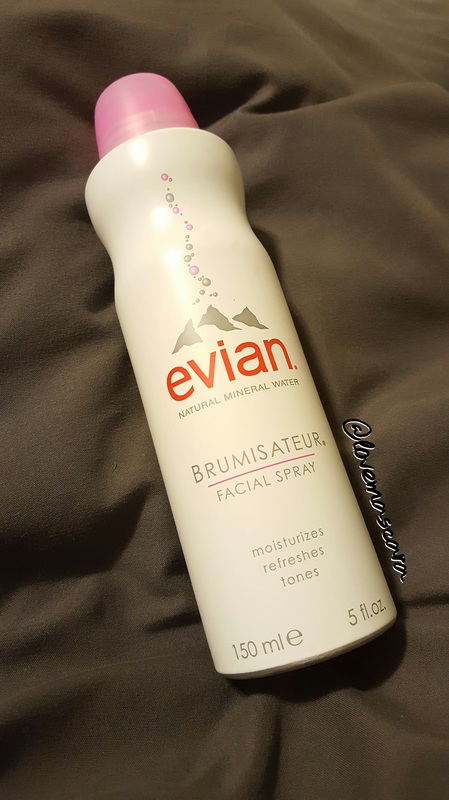
I see a lot of people who love Evian Facial Spray and then a lot of people who ask "What's the big deal?" So I'm here to talk about that today. Essentially the Evian Facial Spray is the same level of excellence of Evian pure spring water that we all know and love, "sealed at the source in Evian-les-bains, France", in a "leak proof canister" that is now available as a facial mist. While this has just become popular in the last couple years thanks to major retailers picking it up like Sephora and Ulta, thus being more accessible, it was actually first introduced in France in 1962 to use on burn victims. It was then introduced as a facial spray in France and then a facial spray in the US in 1978.
I know what you're thinking...it's just water...I have water at home. Ok, here's what makes it different: Evian Facial Spray is an all natural skincare from the French Alps, it's obviously going to be great for any skin type or age, and " To ensure that every canister of evian® Facial Spray contains the same extreme purity and neutral 7.2 pH that has earned decades of international respect, evian® water is tested 300 times each day." **skip this next paragraph (aka chemistry lesson) if you want to get to the product information** So I hear you asking me "What does all that mean?". Well I'll tell you: "pH is a measure of how acidic/alkaline water is. The range goes from 0 - 14, with 7 being neutral. pHs of less than 7 indicate acidity, whereas a pH of greater than 7 indicates a base ". So a pH level that is less than 7 means the water is more acidic and a pH level higher than 7 is an alkaline or basic. Typical rain water has a pH of around 5.6 which means they're more acidic thanks to Carbon Monoxide in our atmosphere, which can effect our environment in a very negative way as well as us. Very low pH levels in water can corrode and even DISSOLVE metals. High pH levels are bitter and cause "deposits" in your pipes it also makes the chlorine in your public water not as effective thus needing more chlorine to be added. Why do they add chlorine of all things to public drinking water? Well, "chlorine is a highly efficient disinfectant, and is added to public water supplies to kill disease-causing pathogens, such as bacteria, viruses, and protozoans, that commonly grow in water supply reservoirs, on the walls of water mains and in storage tanks". So see? you're water at home, unless you have a purifier of some sort isn't so basic and pure. There's a little science/chemistry/hydrology lesson for you. So "7" is the official neutral and when I was in highschool it was 7.35 so Evian is 7.2 making it a neutral pH level still. Evian Facial Spray has a balanced and unique mineral content, and a safe natural Nitrogen to "propel" the mist so that it doesn't harm the environment ( "80% of the air we breath is Nitrogen by the way). When you get right down to it, it's the most natural form of hydration in a facial spray on the market. I actually have several of these and they're in my kit as well. I've been using them for about 2 years I guess, maybe a little less than. I personally only like two facial mists which is this one, and rose water, because I find that "hydrating" sprays really make me very oily. My makeup doesn't last if I use a "hydrating" facial mist under it or over it to refresh myself. Even with rose water spray I can only use it when I have no makeup on, and I only use that when my skin is irritated. This is the only spray I can use to "prep" my skin for makeup, or "refresh" my skin when my makeup is on without disturbing the longevity of my makeup. That's not all I use it for though. If you've been reading my blog or following me for a while you know that I love loose pigments and I always apply them with a damp brush for a more intense pay off or foiled type look with less fall out. To get a damp brush and not a "wet" brush, because trust me you'll regret it if it's super wet, you have to use a facial spray or mist. Now yes, I know there are other sprays that you can use but let me ask you this: How much do those sprays cost you? Even the more inexpensive sprays are still probably more costly than the Evian Facial Spray costs when you think about how much product you get for the price, which I'll get to. Also, you need a very even and pretty "fine" mist. Not a spray that soaks you or an uneven spray that is huge drops here and there basically being wasteful. Also other facial sprays aren't as good of packaging as the Evian Facial Spray. It is in a leak-proof canister, where all other sprays on the market right now are mainly in plastic with a twist off spray nozzle. (You can recycle this canister as well.) I feel like the canister keeps the facial spray pure and uncontaminated because it is leak proof you can't screw off the lid and pour it out like a general face spray, and the canister keeps it cooler as well so that when it is sprayed, say at the beach or on a hot day, it's always very refreshing and cools you down. I take this with me to the pool or to cookouts in the summer and it's awesome and I know it won't leak out in my bag. Also, throw this in your gym bag that way you'll look and feel better at the gym. Of course your can mist it over makeup through the day to boost your color again, lessen the appearance of dry patches, or just give you that really healthy glow that hydrating mists seem to do so well. I also used it over the course of Halloween, for body painting with water activated paints. Another really good thing to use this for is, before doing a sheet mask. I actually just read about this not long ago and I thought it was a very cool. So what you do is spray this on your clean face, wait for it to absorb the minerals, pat dry, and apply your sheet mask. The reason this is cool, I think, is because when you spray this it can help remove perspiration, chlorine, and other things on your skin. So even when you think you skin is clean, give it a spray just to make sure. This truly just feels like a spa facial, only not as expensive. A lot of times I add this to a sleeping facial. So again clean face, mist, pat dry, apply your nightly regimen, apply sleeping facial (which is a cream usually) and then when I feel like it's mostly absorbed I'll mist myself again before I lay down. Mainly because some sleeping facials or mask are firming, brightening, pore minimizing, etc and this can add the hydration benefit. Also I like to do this because sometimes a moisturizer, or mask can feel stiff or tacky even to the point that it will ball up on the skin if you rub your face and I can't stand that. So I will mist myself again afterwards to take away that stiff feeling.
I'm gonna leave the link for Evian below:
http://www.evianspray.com/ Follow Evian Spray on Instagram @Evianspray and also follow myself if you'd like @lovemascara and show how you use your Evian Spray as an #anytimespa (use the hashtag) Also they were kind enough to do a giveaway for my lovely readers. 20 people will win (1) 10 oz professional size and (1) 5 oz travel size. Which is about a $30 value. So thank you Evian for that! I'll leave the giveaway form below:
**Powered by Brand Backer**
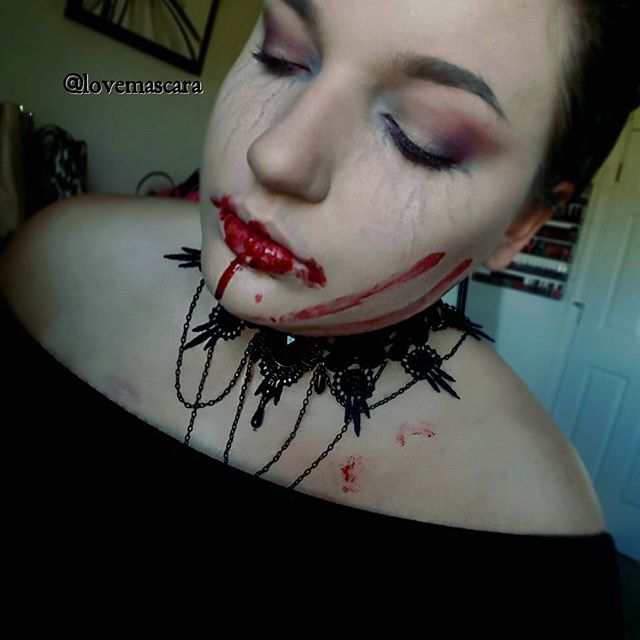
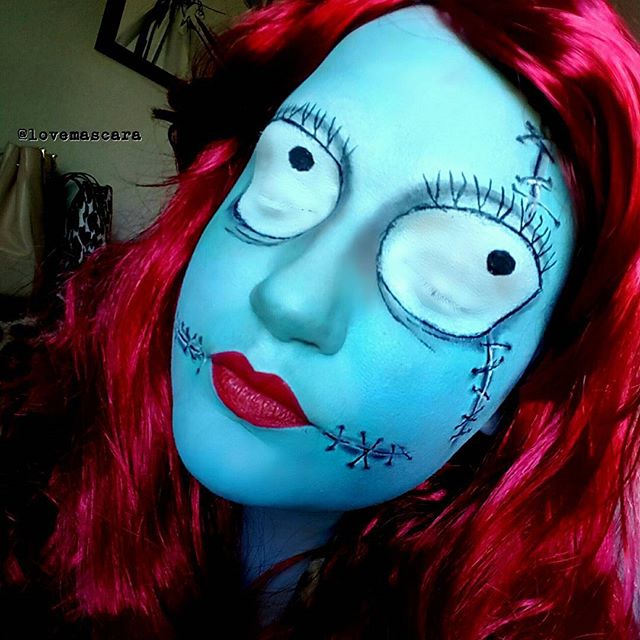
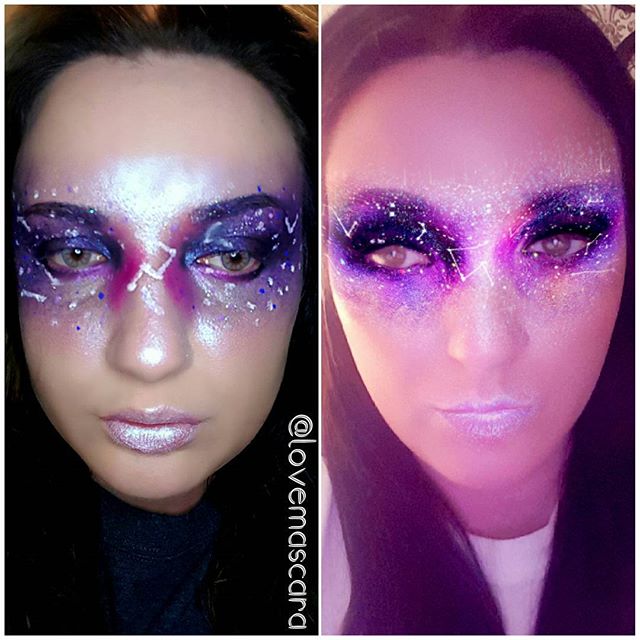
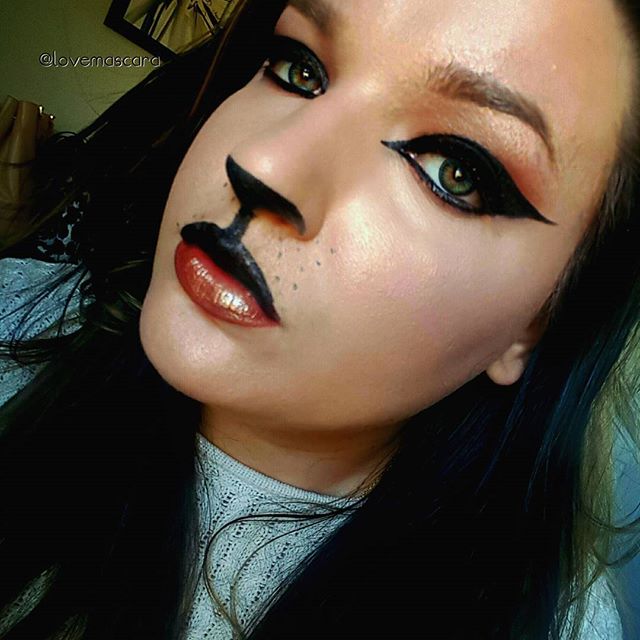
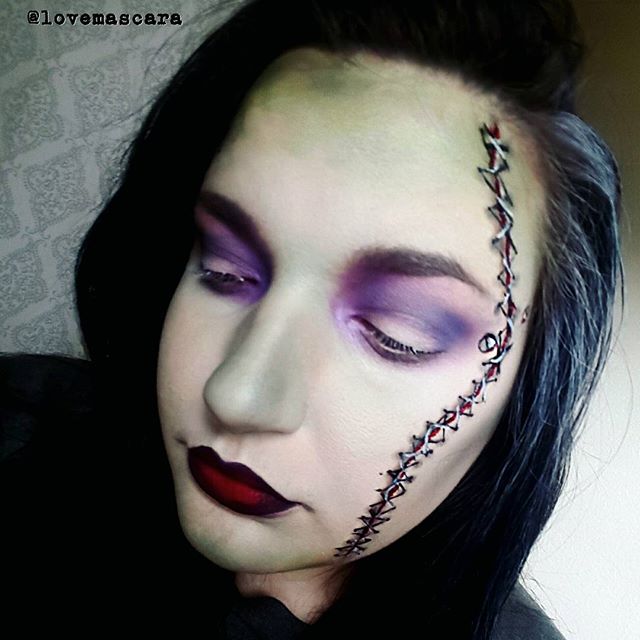
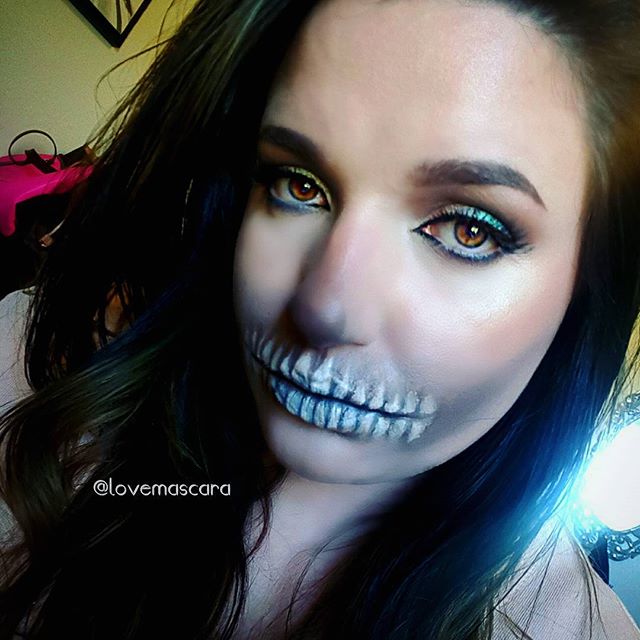
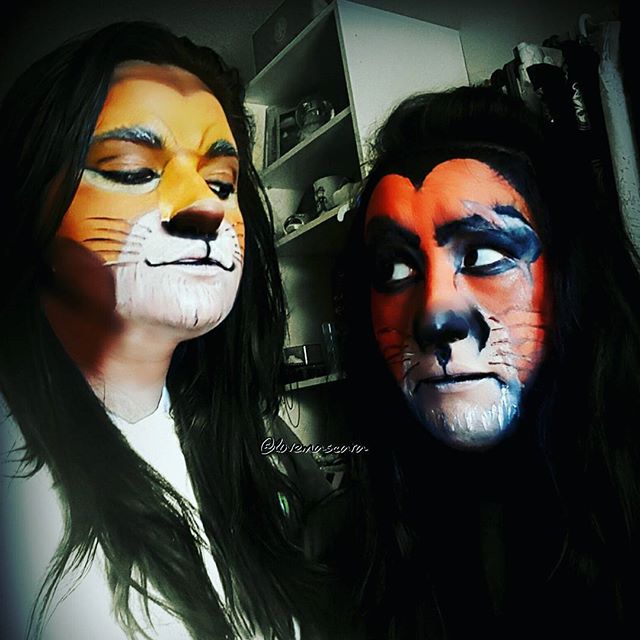
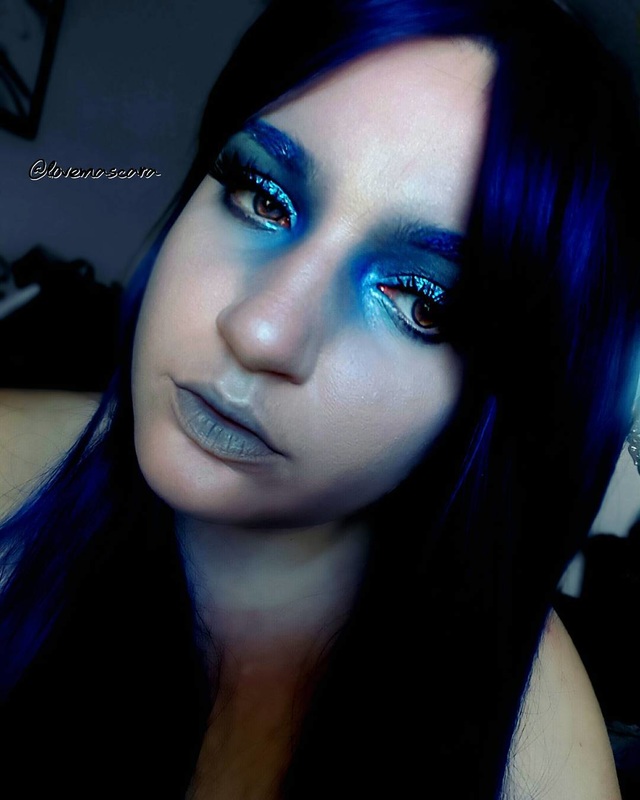
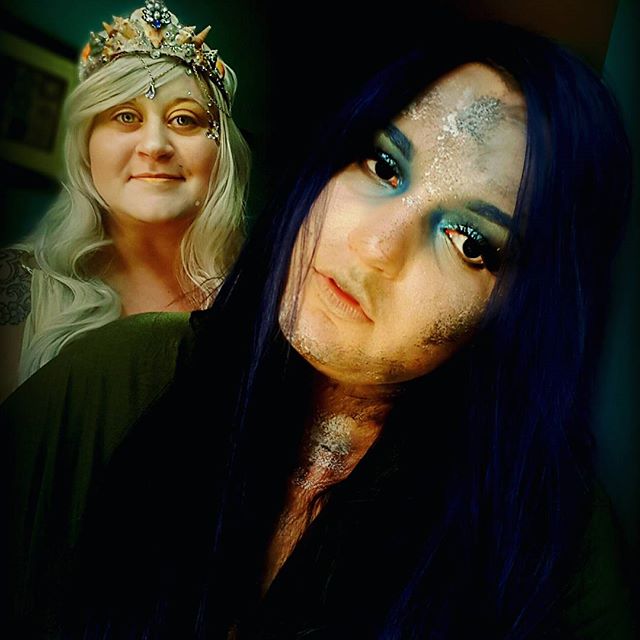
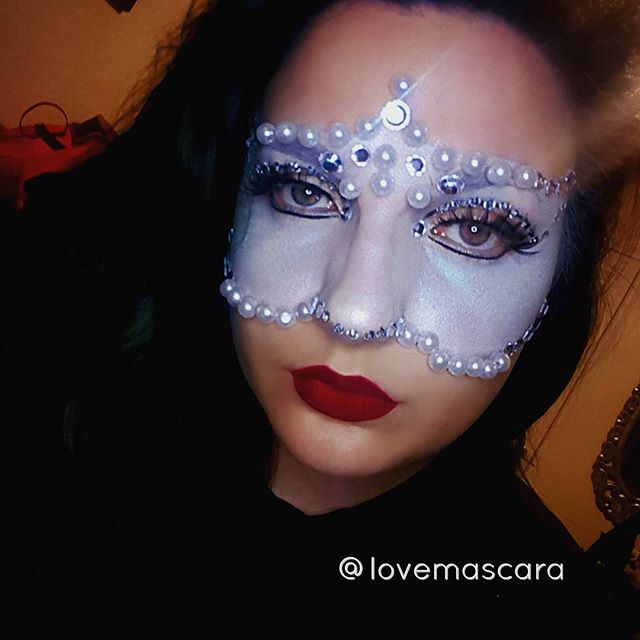 I am in no way, shape, or form, an expert or pro at Special Effects makeup, makeup artistry, Halloween Makeup, or Body Painting. HOWEVER, the plus side of me being not a pro is that I know what it's like to be a beginner and wanting to venture past the face paints in the Halloween aisle at Walmart (not hating, because some of them I do use as a base). So really just in the last two years is when I started looking at other brands and places and figuring out what does the best for me. So I do have some tips and tricks that I've picked up along the way. Tip 1 Don't disregard how useful actual makeup can be. For instance the NYX Jumbo Pencils are really good bases and there have been several times that I've used NYX Milk Jumbo Pencil as a white base for my entire face just make sure you set it with powder though heavily because it is a cream, it will heat up and smudge and move. So when they go on sale for buy 1 get 1 half off or whatever at Ulta I jump on that. They're great bases for eyes but also good from an artistry stand point. Also my go to, ride or die, ace, number 1, thing I use for detailing is liquid liner and my preference is Ardency Inn Punker Liner that is waterproof. I have an affiliate code I'll leave it below if you want to use it in the future to save some money. They are so good to me they know how much I love it and keep me STOCKED. I believe I have 3 right now. Keep in mind I use it EVERY TIME I do a themed look for Halloween, Snapchat Filter or whatever. Plus liquid liner is the absolute best for Leopard or Cat looks. It makes life so much easier in my opinion. Another thing I really like is contouring, no matter what color you need, with eyeshadows and a tapered contour brush. Also for shading and bringing dimension to things you've drawn to make them appear to be "on top of the skin" it's easier to use matte eye shadows that you have and brushes to shade. A really good person to watch for stuff like this and all around general bad ass-ness for Body Painting and Makeup Artistry is Jordan Hanz. She does 31 days of Halloween tutorials, she's a stickler for details and she's honestly taught me so much because she explains why she does this and that. I'll link her youtube channel here. Tip 2 What to buy. I'm gonna tell you if you're going into this as a person who's gonna do this more than just once a year buy some palettes. Get a Mehron palette. I have one that I got off Amazon from Mehron it wasn't expensive I think it was just $25 at most. It has 8 really good sized water activated paints. The second thing is a grease paint palette, or cream paint palette. Whether that is the Make Up For Ever flash palette, Color Wheels from Ben Nye are also a good choice and much less overwhelming and more cost efficient, iMagic also has a flash palette that I actually have as well and I have no complaints about it. It's available on Amazon and it's definitely the cheapest but looks dead on for the Make Up For Ever flash palette. I prefer to buy palettes that are primary and secondary colors which is bright colors like your basic blue, green, red. white, black. purple, so on so forth. Then if you want to get into flesh colored ones later you could but I'd rather buy those as singles or just use my RCMA palette. That's just me though. Now if you aren't sure you'd use that and don't want to have palettes just kicking around not being used I recommend getting single paints from Frends Beauty by brands like Global Colours, Ben Nye, Kryolan, etc. They have plenty of options and you're probably looking at like a $7-$12 price for one single color. If you don't already know you can sign up for a free membership with them and always get 10% off your purchase (no I'm not affiliated, I just try to save you all some money). Also Snazaroo has even more afforable single paints and palettes on Amazon. Tip 3 Water Activated vs Cream Paints. THIS..........took me a while to figure out my preference. I went for cream when I first started because I was more comfortable with that and I knew they would be full coverage. HOWEVER, I found that I prefer "water activated" paints much more because they can be very full coverage, the products lasts longer, and they dry down matte and don't have to be "set". You can also go over any patchy areas with a cream paint if you want more coverage. Or a lot of times you can "highlight" with a cream paint. Like if you painted you're whole face or body a cobalt blue, you could go over it messy like with a sky blue or a paler blue cream shade and that would bring your look from a flat one shade, to a more dimensional base without really having to do much like shading and what have you because you would already have that going on somewhat. It's all personal preference though, just remember to set the living crap out of cream paint with powder. Preferably a powder that is the same color as your cream paint. Just for that added color. Tip 4 Reference Picture. Whether you're re-creating an artist's work (by the way always give credit for that, it's just polite), or a drawing, cartoon, comic book, what have you. Have a picture nearby, pulled up, so you can look at it quickly and look often so that you know you're on par with what you're doing. Also, it'll make it easier for you to find places or ways to make the look you're own if you want to change it up, if space is an issue. For example I just did the Bride of Frankenstein and I had a reference picture for the stitches but it didn't mean that I did every single detail like the picture. I made it my own by choosing to add in eyeshadows, a sculpted brows, ombre lip but still keeping to the traditional stitch line, screws on the temple and the major identifiers that signify that "yes, that is a Bride of Frankenstein look". Tip 5 Buy separate brushes for artistry and special effects like blood or whatever. This isn't exactly necessary it's just my preference that I find has made things easier for me. I buy actual art brushes and I also buy separate sponges. I get the sponges on the stick in the craft section even. They make for really great "texture looks" with water activated paints. The synthetic artist brushes work really well with fake blood but it's almost like a putty so it can ruin a brush if you aren't careful to wash it pretty quickly. I don't use these brushes for blending or shading with powders just when I'm dealing with water activated paints or sfx products like blood, dirt, mud or whatever. Tip 6 Using adhesive. I apply adhesive with a disposable wedge sponge. If I didn't have liquid latex or something I've used eyelash glue several times and it works really well for minor things. It's not gonna hold very heavy things but for my Pearl Mask I used eyelash glue and it done well. Liquid latex is a bit more stout. If you are allergic to latex you can use gelatin, makeup wax, spirit gum. Some people use Elmers Glue or white glue. To each their own I guess. Also when using it, try to work in small sections. For instance if you want it to look like skin is peeling or whatever take tissue paper and tear it into little pieces, then glue it and then paint it. You may have to add glue over top of it before you paint it. For textured looks or building up features like more prominent cheek bones, or a large swollen bruise use torn cotton and work in layers: glue, apply, glue, apply, glue, apply till you get the shape and height that you want. Tip 7 Don't be afraid to use blood. Blood is very cool to work with and it can take an "ok" scary/gory look and turn it into a more detailed real like effect, that looks far more detailed and complicated than what it actually is. The best thing I ever bought was Ben Nye Thick Blood that I got from Frends Beauty, it's very much like a jam/putty texture and I love it. I also use regular ol' vampire blood from the halloween aisle at Walmart when I need a thinner blood to run, or splatter, or whatever. If you don't want to go that route another thing that I used to do is start with a black shadow for the center of the cut or whatever, then use a burgundy shadow around it to show irritation to the skin, then start adding red liquid lipsticks in different shades, red cream lipsticks to add different texture and then glosses to give the bloody effect and it worked just fine. So those are all my tips. I hope you have a happy and safe Halloween. I'm gonna leave some of my fave looks from this year at the bottom. Enjoy!! **Affiliate codes:** Ardency Inn "LOVEMASCARA" FOR 15% OFF Be Biotin Hair Vitamins "LOVEMASCARA" for 25% off 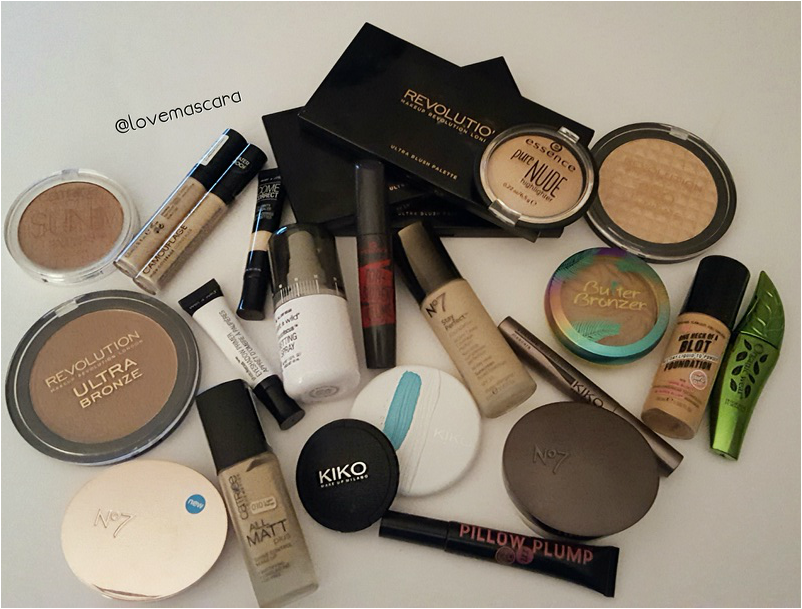 Over the last month I have been on a search, nay, a quest, if you will, for awesome AFFORDABLE makeup. So of course some fave stand by brands like Makeup Geek are a given, but I dove deep in the aisles of inexpensive makeup to find hidden gems and try new things. So recently Walgreens started carrying Soap and Glory and No7. Now these are more expensive than your typical "drugstore" makeup but the beauty with this is that Walgreens and Ulta for that matter have coupons and rewards so you can save money. So I'm gonna go by brands. I think it'll be easier to break it into price categories going from the highest to lowest price point as a whole. 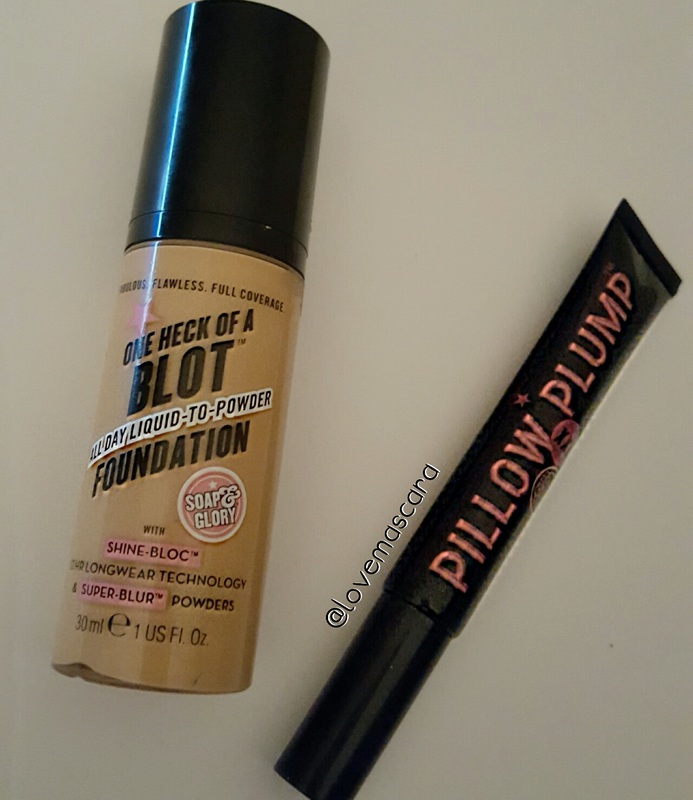 With Soap and Glory I only like two things so far. The One Heck of a Blot foundation (total recommendation from my friend Rhea) and the Pillow Plump XXL clear gloss. I got mine from Ulta and it was buy 1 get 1 free plus $3.50 off a $15 purchase. The foundation was $19 there though (and still is mind you) and it's $14 at Walgreens. The gloss is $14 at both Ulta and Walgreens though. The foundation is a "Liquid to Powder" and that's true. It goes on really nice with good coverage and dries down to a powder/satin finish. What I will say though is there is only 4 shades and that's a BUMMER. It also doesn't work very good on very dry or mature skin in my opinion. I used it on a client the other day and it just sat on the skin. It didn't blend or anything. On younger skin and normal all the way to oily skin types I think it does really well. I know Walgreens always has coupons and sales, with up to 7% cash back from Ebates. Ulta still has their coupon but keep in mind it's $5 more at Ulta. The gloss comes in numerous shades but I got clear. My reasoning for getting a plumping gloss was because I like the Dior Maximizer and the only reason I use them is because I do use the Lip Enhancer tool that you see from time to time on Instagram. So like I said I like the Dior one but was running out so I decided to get this. It smells like chocolate which is a bit odd but not bad. It's about 3x more tingly than any other plumping gloss I've tried. I use the Lip Enhancer in conjunction with a pumping gloss for a more lasting effect. This is super super tingly. So if you don't like that, don't get it. 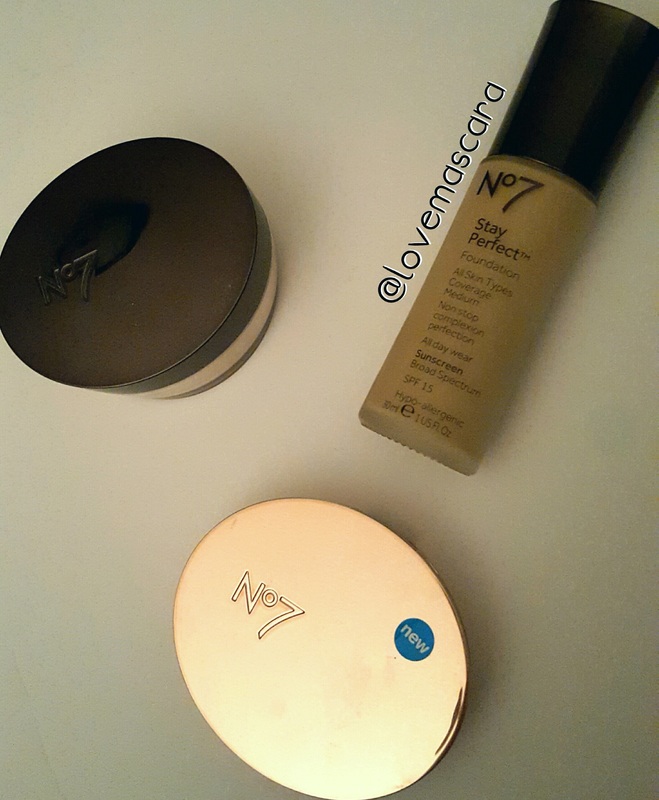 sNext is No7 cosmetics. I have 3 things from them. The Stay Perfect medium coverage foundation, the shimmer palette in Rose, and the Translucent loose powder. All 3 things are around $12-$14 each. I've only seen this at Walgreens where I live, I know it's sold in Boots as well. This company has a very luxurious feel to them, the packaging looks expensive with the gold compacts, the glass bottles and so on. The Stay Perfect foundation I really really like. It's definitely medium coverage but it doesn't oxidize and has a natural finish. They also come in a ton of shades which is great. The shimmer palette in Rose is the lightest of the 3 palettes I seen. The packaging is gorgeous. It's very similar to a shimmer brick. It has four rows of different colored shimmers for a bronzey-pink highlight. It's incredibly soft. SO SOFT. It has great pigmentation. I would like to see a shimmer palette that has very fair tones because on me the Rose shade is still a bit darker than I would like but it's still wearable. To me this is just as good as the Lorac Lightsource highlight, not as intense as a Becca highlight but similar in texture. The translucent loose powder is really nice as well in my opinion. It's not white, it's an Ivory/beige. I used it to set my under eye and it worked well. I tried to use it to bake and it work fairly well. The RCMA No Color Powder is better in my opinion and less expensive I think. This is more convenient though seeing as it's in Walgreens now. This sets the entire face beautifully and you can really go in and apply a heavy amount and it still look very nice which I like. So whether you apply this with a sponge and heavy or with a fluffy brush and lightly, I think it would work well for you. 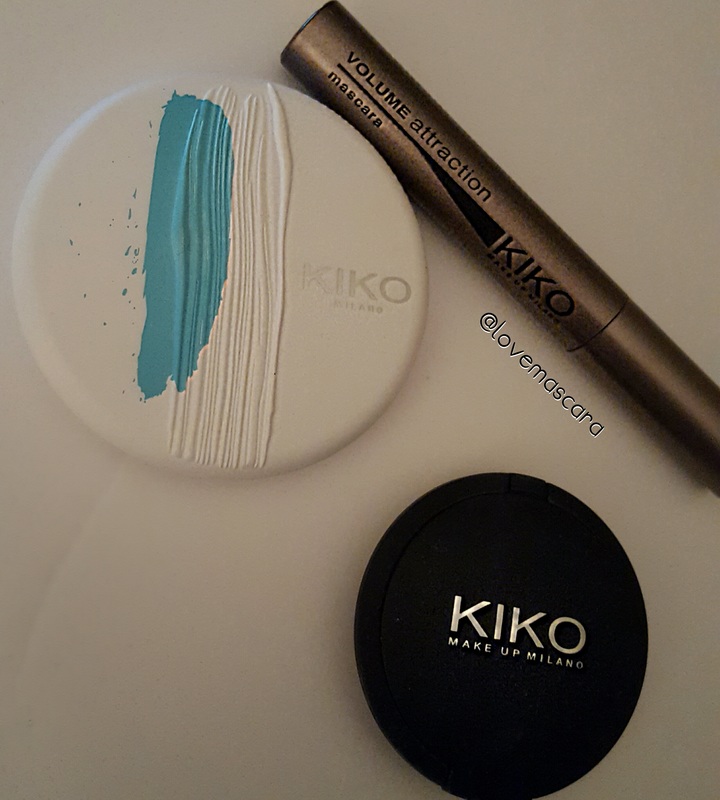 Next I'm gonna talk about some products from Kiko Milano, which is an Italian brand. They are available online and they do have some very nice products. They run a lot of sales as well which is when I would buy from them. You can sign up for emails and get $5 off your first order I got quite a few products from them because their mascara was on sale for $5 and it's usually around $14. I also picked up some other products. Not everything was great but some things really were. So first I really like the Soft Touch blush. I have shade 108. It's definitely soft. It's also very pigmented when applied. More so than just swatching it on your hand. So bear that in mind and don't get too heavy handed with this. This is currently $3.80 and there are 2 shades. Another blush I really like is the Blending Wave Multicolor Blush. Which is a two tone/ombre style blush. I have shade 4 it's on sale for around $6 marked down from $12. This again is super soft and pigmented like crazy. The packaging is cool and the product looks cool on the inside. It's just all around good. I got 2 mascaras from the company. The one that I like was the Volume Attraction. At the time it was $5 but it's $12 now. It's hard for me to find mascaras that make a difference on my small thin lashes. This coats them very well which makes them more noticeable and really builds at the base of the lash line. The brush is a simple brush similar to my all time fave mascara L'Oreal Carbon Black, only a bit smaller. The pigmentation is really great, it's very black which is awesome and with the fact that it coats the lashes evenly it just makes my lashes stand out even more. 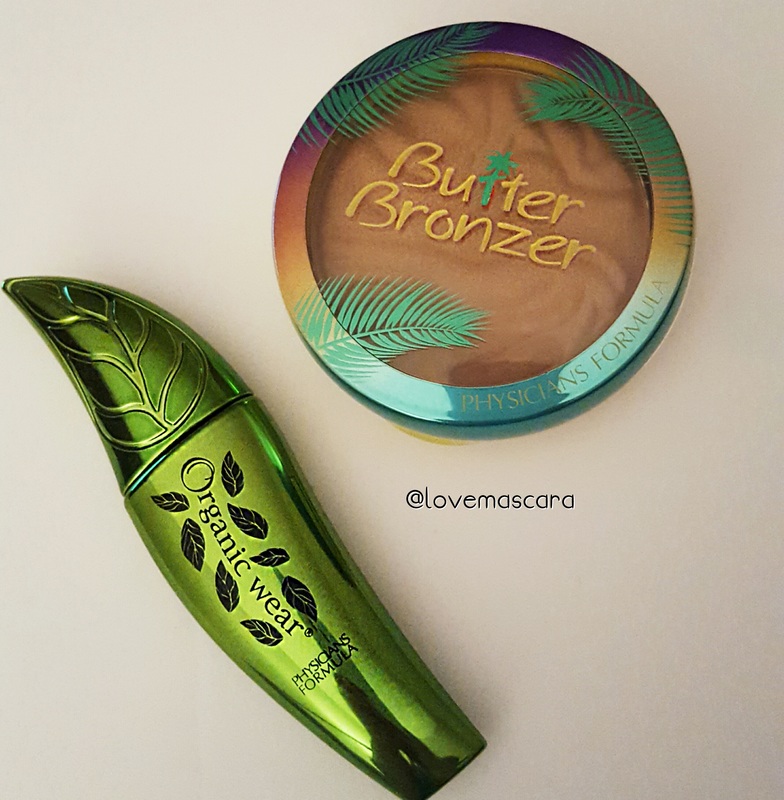 Moving onto a more recognizable brand I have two things from Physicians formula. First off is their Butter Bronzer. Now you've probably heard every big beauty guru talking about this and for good reason. It's a natural satiny finish bronzer. I always love their bronzers in general. This one is amazing though. The packaging is awesome per usual. The scent though is coconut tropical goodness. It smells like summer. It's not an over powering bronzer, it's not overly orange, it's just a really good bronzer. It's on sale at Ulta right now for $9. Keep in mind you still have that $3.50 off coupon to consider, plus at least 3% cash back from Ebates. Next is the Organic Wear Jumbo Mascara. This is not something I would typically like, because I'm hard on mascara like I said. The wand is plastic (I stab myself in the eye with those it never fails) and it's also huge. BUT this is really good. It really lifts the lashes in my opinion and doesn't over load your lashes with product so you can build and build without getting super clumpy spider lashes all of the sudden. The packaging again is adorable, it's a big green leaf. This goes for $10. 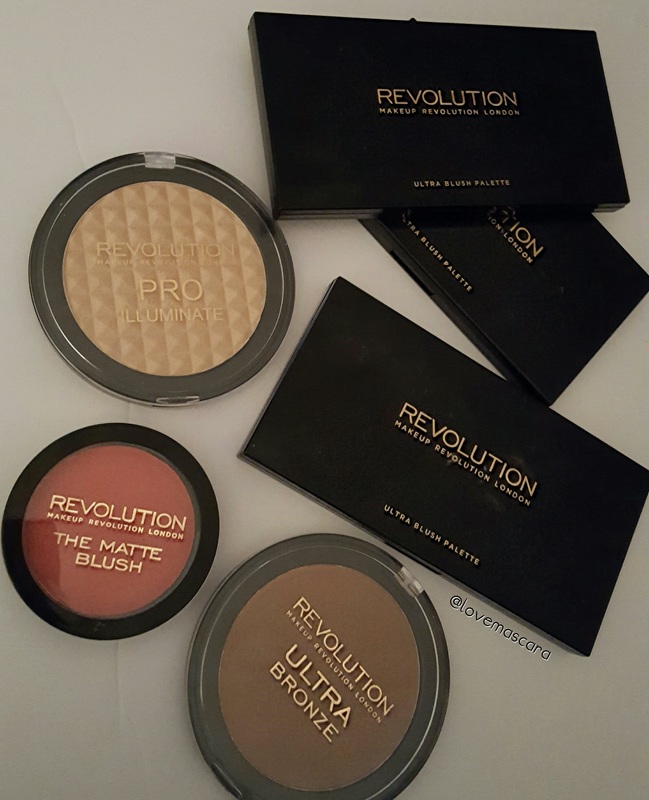 Next is Makeup Revolution. This is sold at Ulta. What I like about this brand is the face palettes they have, except the Beyond Radiance palette. I think this brand has great palettes if you're needing to start a kit or wanting to try different shades of blush, bronzer, contour and highlights, etc. without breaking the bank. First is their blush palettes. All of them. I love all of them. I am partial to the Ultra Blush and Contour palettes out of them all. They have 6 shades that are matte to satin finish and then 2 shades that are highlight/baked/shimmery shades. The formula is great and the packaging is sturdy. These are only $10 and they have a lot of product inside of them. I also really like the Pro Illuminate and Ultra Bronzer. They are both $7 and I'm pretty sure they have .52 oz in the pan, which is huge. The Pro Illuminate only comes in one shade but it's a dead on dupe for the Becca formula. It's a very warm gold shade though so keep that in mind. The Ultra Bronzer is soft and pigmented. It has no shimmer or shine to it which I love. It's quite warm as well but not overwhelming. It's super pigmented so again don't go in with a heavy hand I use mine with a fluffy brush from Real Techniques. The Matte Blushes are quite big as well and super soft. They have very bright colors so I suggest looking at these in person if possible because the one I have is much brighter than it looked online. However, they are only $5 and can be returned to Ulta. 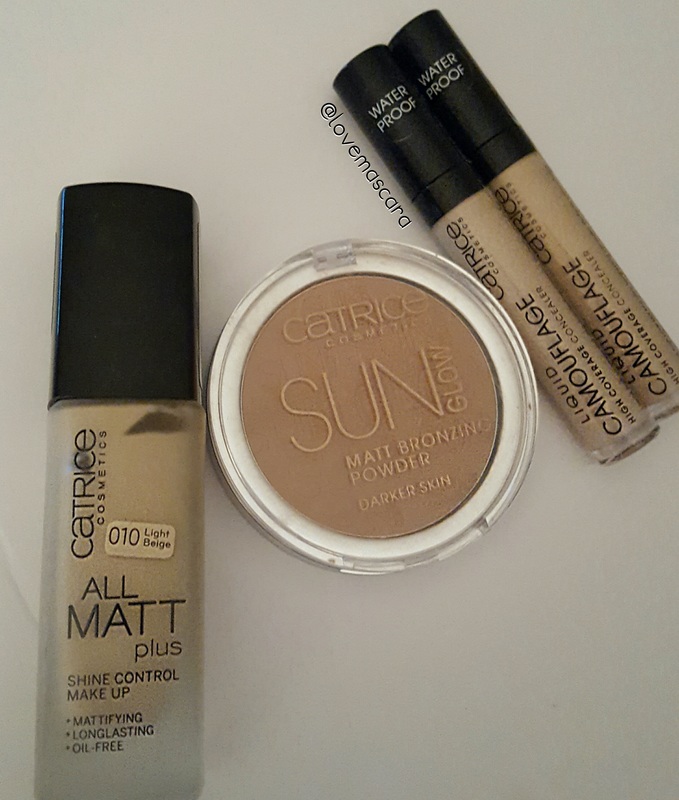 Catrice Cosmetics are slaying my life right now. Don't get me wrong there are items I don't care for but a lot of what I've tried has been really good. I have their 18hr wear All Matt Plus Shine Control foundation. This was $5 when I bought it and now it's went back up to $9. Catrice foundations tend to run dark from what I hear and that definitely is the case with mine. I got the lightest shade which did oxidize to a darker shade and different undertone but I figured it would so I was ok with that. They only offer 5 shades which sucks. I will say I use more of this than you would with a normal foundation, I think it needs a generous amount of product to get you the desired full coverage it claims to be. It performs really really well though. I had no issues wearing this for 9 hours. It stayed matte for the most part and it didn't get patchy, lift, move around or anything. So I really really like this. I wish it was still just $5 though cause that's an amazing find. Next is the waterproof Liquid Camouflage Concealer. I bought 2 shades in this, the lightest two. There are only 3 shades and these are super pale so, again, not much to offer in shade range, but I kid you not this is one of the best concealers I've tried. At the time when I bought them from Ulta they were $4 and now they're $6 which isn't bad. I use this on the under eye area and it's got great coverage, while not being super thick. I feel like it's similar in texture to the Urban Decay weightless concealer and better than the Too Faced Born This Way concealer. I can't say how much I love these enough, just try them. Another good product from Catrice is their bronzer. It's soft and a neutral tone. To me I think it's kinda similar to Hoola Bronzer from Benefit but maybe a bit warmer. It's matte and pigmented. It's $6.49 right now. They also have a light shade in it which for very fair skin I think it would be ideal.  Wet and Wild has been doing alllllll kinds of good lately. The products I'm gonna talk about are what I feel don't get enough love. Their Photo Focus Eyeshadow Primer. This is like $4 and it's better than my Urban Decay, Too Faced, Nars, Benefit, basically all my more expensive eyeshadow primers. I have the oiliest lids ever. There has been no primer until now that would keep my shadow from creasing and this does. I set it with a bit of powder before I start applying my other shadows. My eye makeup doesn't transfer, doesn't crease, it stays the same all day. Next is the Photo Focus Setting Spray. This is around $5. The spray or mist on this is even and in my opinion similar to the All Nighter spray from Urban Decay. Maybe not as strong as that one but close. I think for an everyday setting spray this is really really good. Lastly is their Come Correct Celebrity concealer. This is under $5. This is a dead dupe for the It Cosmetics Bye Bye Under Eye concealer. Same texture, same thickness, same effect and coverage. I use this to clean up mistakes, cover blemishes, sculpt brows, and even on my under eye area. For the under eye though I recommend blending it out with your finger and not a brush and then setting it, doing one eye at a time. I just like that better because it's so much thicker than other concealers. It's totally full coverage and amazing. 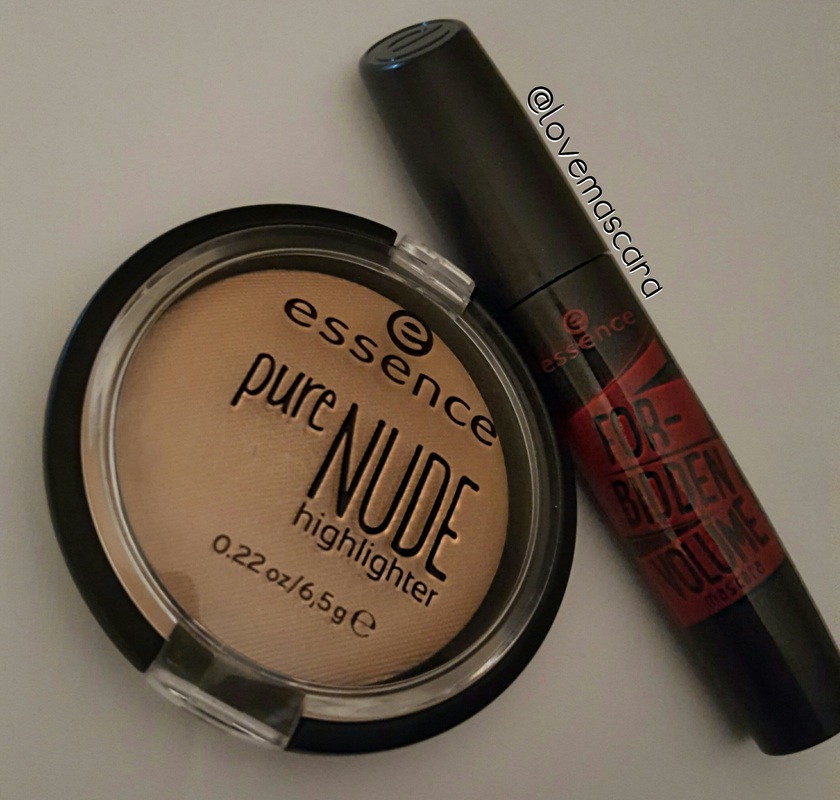 Last brand I wanna talk about is Essence. I have a few things from them as well.
I got a free tube of their Forbidden Volume Rebel mascara (I accidentally took a shot of the originial mascara and not the Rebel. Rebel looks the exact same in packaging only it's red) with purchase and I like it better than the original which is the other way around for a lot of people. For me though I like this wand better and the way it coats my lashes fully. This is $4.49 and available at Ulta. Next is their Pure Nude Highlighter that's also $4.49. I wish they had more than just one color but this is a good dupe for Champagne Pop I think. It's warm bronze-y shade and super, I mean super, pigmented. I also like their eyeshadow primer: I Love Stage Eyeshadow Base which is $3.49. This isn't AS good as the Wet n Wild but it's still very good. I notice creasing after about 7 hours or so. I will say I hate the color of this. It's very orange. However, after blending it out and applying a light matte shadow to set it, it's not noticeable, on me. So those are some brands and products that really stand out to me, that I feel are just as good as things you would find at Sephora. Other great affordable mentions are: L'Oreal Carbon Black Mascara L'Oreal Lineur Intense liquid liner Colour Pop Gel Liner in Swerve Makeup Geek, JD Glow, Colour Pop, and Coastal Scents single shadows Morphe Brushes new concealer Colour Pop Lip Liners and Satin Liquid Lipsicks Jordana Lip Liners Elf Blush palettes Max Factor Masterpiece MAX mascara I'm sure there are more awesome products that I just haven't tried yet but these are what's standing out right now. I don't hear people talking about a lot of them so I wanted to talk about them.  It's football time in Tennessee!! Time for parties, cookouts, and tail-gating. Which means you, my friend, are gonna need makeup that will hold up through all the festivities. So I'm bringing you some sweat-proof, cheer proof, food proof, drink proof, etc makeup that will last you to the after party. First up you're gonna want your base to be prepared for a full day of talking, cheering, hugging, possibly fighting (just kidding that's bad sportsmanship), and so on. So I would choose a great basic moisturizer with no extras and for that I go with Sanitas Oil-Free Moisturizer. This works for all skin types including dry. It's not going to add extra oil to your foundation or change the finish of it and that's why I like it. Next is primer, obviously. However, picking the correct primer is essential so there are two that I'm gonna include. First is the Make Up For Ever Mattifying Primer if you have combination/oily skin. Second is the Make Up For Ever Smoothing Primer if you have normal, dry, or noticeable pores and texture. I don't recommend it for the oily skin types because the silicone in it can cause the oil production to be more noticeable in my opinion. For foundation I have two as well. For combination/oily and also normal skin I would go with ABH Foundation Stick. It's super light weight. It's a drier formula that doesn't get super dewy or transfer and it's good medium but build-able coverage. For those who need more coverage I would totally go with the Milani 2 in 1 Conceal and Perfect foundation. It super full coverage and it looks beautiful. It's quite thick in formula but it covers nearly everything so you won't have to touch up near as much and you won't need a ton of concealer either. Speaking of concealer there's really only one I recommend and that's the Lancome Effacernes Waterproof concealer. This is specifically for the under eye but I would think it could be used on the rest of the face as well. It's waterproof and it does not budge guys. It's not thick and cakey, it looks beautiful. I recommend this for anytime you need your concealer to do work for you all day long. For powder I really recommend baking and for baking I only use RCMA No Color Powder. It's the best, it's affordable, and by baking your makeup it just locks it in even more and makes it nearly bullet proof. For eye shadow primer there are a couple I like which is Wet n Wild Photo Focus Eyeshadow Primer and the Benefit Stay Don't Stray eye primers. For glitter I use the NYX Glitter Glue. I think game day's are always appropriate for glitter, by the way. As far as shadows go I like super pigmented shadows that won't have fall out as the day goes on, so you don't have to worry about cleaning it up all the time. So Makeup Geek is my first choice and then Juvia's Place. For liner definitely get a smudge proof and waterproof liquid or gel liner. I love MUG Immortal Gel Liner, Ardency Inn Punker liquid liner (my code LOVEMASCARA will get you 15% off), and Colour Pop Swerve gel liner. I don't recommend crayon liners or putting it in your water line because it'll end up in the corner of the eye in no time flat. If you are going to do that though take a mirror and the liner with you because you will need to touch it up often. For mascara use a smudge proof and preferably water proof one (keep in mind that waterproof mascara is quite hard on lashes so I don't wear it unless it's an event). My fave is the L"Oreal Carbon Black Voluminous mascara. Go easy with highlight unless you are incredibly dry with no texture issues at all and then...go hard if you want. I find that as the day wears on the more intense highlight can look and while that's cool it can also magnify pores. So I would go with a subtle highlight, if you want to highlight at all mind you. I would probably use Laura Mercier Baked Highlight in 01. You could also go for a matte highlight which doesn't "glisten" but still gives that "lifted" effect and use Benefit Dandelion Shy Beam. As for bronzer/blush/contour. Use whatever doesn't oxidize on you and keep it pretty neutral. Again though, baking will really help lock in things like contour and what not. It's never a bad idea to take a brush so that you can blend out any patches you make get from touching your face in despair or stressful times during the game, etc. For lips you can go two ways, 1). liquid lipstick that is a neutral color that when it fades off (cause it will) it won't look nasty or crumble while you scream at your team from afar. I recommend Tarte Nameste or ABH Stripped possibly. 2) go for a sheer tint that will wipe off easily but never noticeably. For this pretty much any of the Lancome Juicy Shakers would work, the YSL Tint Oils are also good or pretty much any tinted balm or sheer lipstick. However keep in mind if you are out in the heat, balms or lipsticks will melt. Even liquid lipsticks get more messy and even more liquid in hot packaging. Remember to set your face, even if you don't think you'll need it, just do it. I like Ben Nye Final Seal, Blue Marbel Setting Spray and also the Urban Decay setting sprays in All Nighter and Chill. If you're super dry and get very patchy I would choose Chill from Urban Decay. Some of my oiliest friends though swear by the All Nighter and the Ben Nye. Blue Marbel and also Green Marble is often what drag queens will use and lets face it they're always fierce. So as for makeup that's all I can offer you but whoever you're cheering on be safe and have fun!   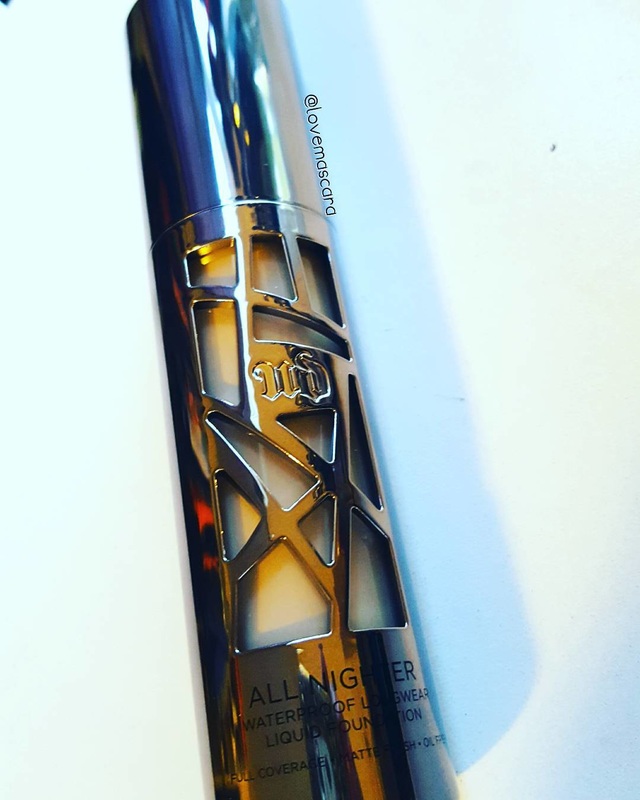 This foundation is new from Urban Decay. It's from the Fall 2016 line. It's not available in stores just yet. It is available on the UD website now. I will link it here. I've been using this for a few days. I got the shade 1.0 because I like yellow bases in my foundation. So here's how I think the shades seem to work: If you like a somewhat yellow base like me get the shades that end in .0. So 1.0, 2.0, 3.0 and so on. 1.0 is the lightest shade in the yellow bases. If you like a bit more of a pink base then get the shades that end in .5. So .5, 1.5, 2.5 and so on. ,5 is the lightest shade in the entire line. There are 24 shades all together. It's a pretty nice range of colors that would fit the palest skin tones and some darker complexions. My shade is actually a bit paler than I am and I'm quite pale at the moment, so I probably could've went to 2.0. The packaging is sick. I mean look at it. It claims to be "waterproof, long wear, and oil free". Which I feel that's probably true. I had some on my hand and I had to scrub it HARD to get it off. Plus it felt like it took a lot to remove it from my face as well. The first day I used this I applied my usual moisturizer which is light weight, a smoothing primer, and then I applied the foundation with a flat top kabuki. Which used more product and made it even fuller coverage on. It also didn't work well with the brush. It really made my skin look dry, it seemed harder to buff out and looked kinda cakey. After it set for a few minutes it looked really nice. It felt fine. After about 5 or 6 hours I noticed one slightly dewy area and then some places where it looked like it was breaking up around dry patches. So I touched it up and it looked even worse. Super dry. Again after it has set for a few minutes it looked better. I used dewy sprays and everything to help the skin from looking so dry but then again it's waterproof so thus that didn't work. The next day I had a better game plan. I used a heavy moisturizer, no primer and a damp sponge to apply it. WORKED SO WELL! FOR THE WIN! It didn't look dry, it required less product and it didn't look cakey. So I'm 100% on board with this, just not for using a brush. Now maybe if you have super super oily skin then that would be the way to go for you, using a brush because the oil from your skin won't let it look cakey and it won't cling to dry patches obviously. 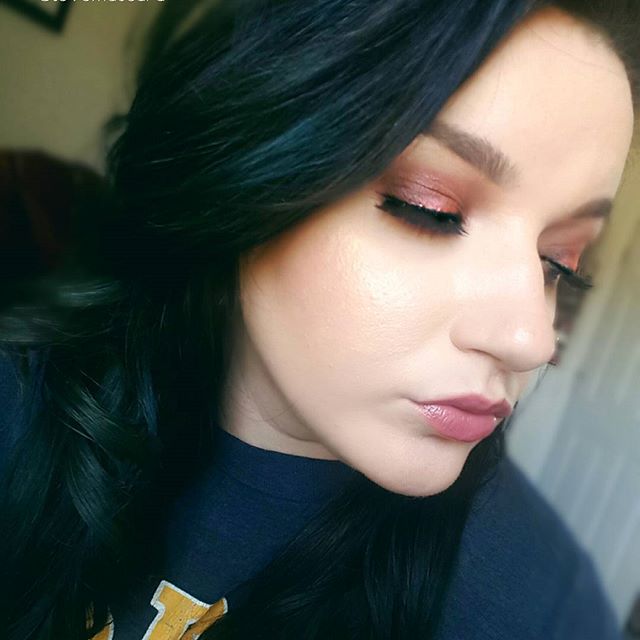 This was the day I used the Kabuki brush. It looks super full coverage in my opinion although it didn't seem to mirror the dry-ness in pictures or on camera at all. Just when I looked in the mirror. It lasted 10 hours which is when I took it off so I think it would've went even longer. 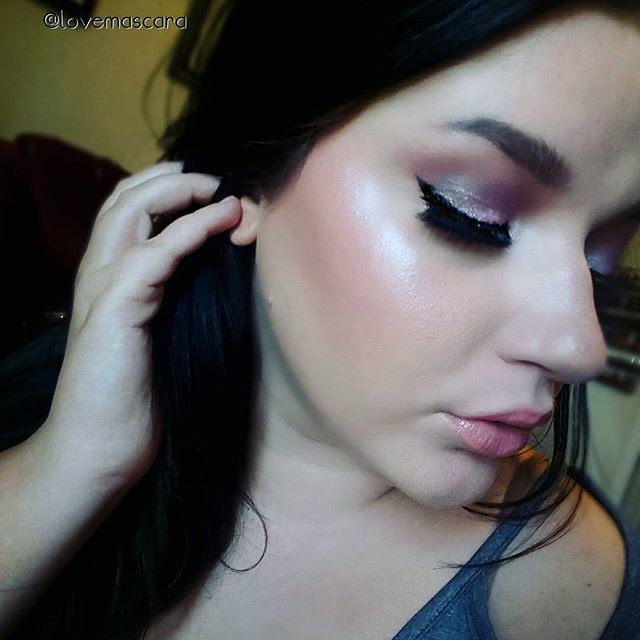 Here I used it with a damp sponge and heavy moisturizer. In my opinion it looks more natural and more like "skin". This lasted about 6 hours before I noticed it was starting to get dewy on me and need to be touched up.
I have normal skin, I don't have oily skin or anything that makes me dewy but it's friggin hot in Tennessee kids. So I was outside a lot this day and heat and foundation just don't like each other. So for my dry and normal girls that want a high powdered long lasting foundation use this with a heavy moisturizer and damp beauty sponge. For my oily and combination ladies I still say start with a damp sponge and if you're still super oily try a kabuki brush.  As you may have probably seen, I always tell you to use Ebates and get you some cashback for your online purchases. I don't think you realize how awesome of a thing this is. So I'm gonna break it down for you. Hopefully, it'll be short and sweet and easy to understand.
1st: THIS DOESN'T COST YOU ANYTHING! Not a dime. Not one red cent. You can join it fo free. If you aren't into it, then no big deal. 2nd: You make money based on going through Ebates activating a shopping trip that has a percentage cash back, (ie: Sephora is sometimes 8% cash back) then it sends you to the site and you just complete your checkout. So lets say Sephora is 8% cash back and you spend $50 as your subtotal, so that's $4 cash back. Now I realized that's not a lot. However, if you are like me and do 90% of your shopping online, it makes a lot of cash back or at least some. You have to at least have $25 in cash back from purchases to get your quarterly check. Which is like May then August, so on so forth. Just as an example. If you don't have it, then it will roll over to the next check until you do have $25 in cash back. 3rd: You can refer people and get more money back. Like right now it's refer 2 people and get $50. In order for the referral to work they have to use YOUR referral link to set their own account up and then spend $25 at least. If you have referrals but don't have your $25 cash back from purchases you won't get a check for that quarter. Which sucks, and I found that out the hard way. 4th: Tons of stores are on Ebates like: Sephora, Ulta, Motives Cosmetics, Kate Spade, HSN, Overstock, J. Crew, American Eagle, so on so forth. Cash back always varies from store to store but sometimes they have double cash back which is cool. I try to use Ebates as much as I can but it's easy to forget to activate your shopping trip so I downloaded the Ebates "button" for my chrome bar which pops up how much cash back that site offers and I can activate it right then while I'm on whatever site. I also have the Ebates app for when I'm shopping on my phone. So far I've made close to $200 which isn't a ton, but it's something. Only about 2 referrals in there, maybe three. My theory is: if you're going to be ordering online anyways why not get cash back for your purchase. They can send you a check through the mail or deposit it into your PayPal account, which ever you prefer. It's easy to keep up with how much you've made or what your cash back was for certain shopping trips. They also offer coupons and what not for whatever site you're on, if there is any. So there you go. I hope that was helpful. Here's the link to sign up for it and Happy Shopping!!  So I know this is a bit out of the ordinary, but I've gotten a lot of questions lately about building up a blog or social media, followers, likes, etc etc. I don't consider myself a "pro" or anything but this blog is coming up on 300k total views (200k in less than a year) and my Instagram has grown a bit after I really put my mind to it, I thought why not tell you what I do to keep gaining ground and what I have done in the past that has worked for me. Hopefully, it might be helpful to some of you. Now I know that there are way more successful blogs out there that probably get more than 300k hits a day, so don't think that I'm conceited or gloating, I'm just answering questions. I'm gonna start by saying that I prayed a lot about starting this path and I prayed for direction and guidance. If I'm being 100% honest with you then I have to tell you that was the first thing I done. I still pray about this everyday, for new opportunities, new connections, help with my creativity and still praying for guidance. It was my first step and my most important step and I fully give the credit to the man upstairs. So just so you know, just so I'm bring honest and true to me, I prayed. I prayed a lot. First I'm gonna tell you: If you don't believe in yourself, no one else will either. That's my main motto. You have to believe that you can accomplish your goals before your dreams start coming true. It's fairy tale-ish but it's true none the less. If you have low self esteem, or rude and hateful comments get to you....you might want to try something with less exposure. People are mean. They just are. I honestly think that %30-40% (at least) of social media is just trolls and people with a chip on their shoulder. These are the people that want to bring you down because something is wrong in their life or they just don't want you to succeed. Because yes....there are people who don't want you to do well in life. So if you can't handle that, then you're gonna need to re-evaluate some things about this certain endeavor. While having confidence is step 1, you have to adapt a business mentality as well. Sometimes you have to say "no" to people maybe even people that you love or think a lot of, sometimes you have to have boundaries, sometimes you have to keep everything to yourself until it's time to talk about it so that no one will take your ideas. Not everyone is your friend in business and you need to look out for yourself first and your best interests. I honestly don't tell hardly anyone, anything about companies I may work with, things lined up that are super exciting for the future, or anything remotely important to my business. For one, you don't need their approval or opinion and two, sometimes people will get in your head and make you second guess yourself and intentionally or unintentionally break your confidence. Second: Be consistent in your posting of blog posts, pics, engage in comments fairly quick and "like" and comment on other people's stuff as well. Make some friends. I've found some awesome people I consider friends through this. It's been really nice having them to talk to as well for recommendations on products or dealing with rude comments. So make you out a list of how many blog posts or videos you're gonna do a week and STAY CONSISTENT. Make it a priority. I stick to about 2 blog posts a week and try to do a makeup look at least 4 times a week for Instagram and sometimes on Twitter. Now I know a lot say they don't "have time", that's fine. Work out what's best for you. Whether it's once a week or 5 times a week, just get into a routine. Be ready to hustle too. There are nights, like tonight, that I'm up until 2 am working on business stuff. Whether it's blogging, answering emails, taking product photos, making notes, signing up for platforms and campaigns to be a part of or whatever. I work for HOURS everyday, to try and make this dream a reality and sadly, people will never understand that. It's not easy, it may look easy but it's not. Not that it isn't fun for the most part but a lot of hard work will go unnoticed. I will say as far as how much you post, the more you post the more exposure you get. So if you're posting once a week you aren't making near the impression as the person posting 5-6 days a week. Third: Quality content. Especially for photos, try your hardest to get the best pictures of your makeup, outfit, or whatever. A grainy photo will never compare to a clear and detailed photo. The more mega pixels the better and lighting is key. If all you have is an iPhone or Samsung then use the front camera not the self facing camera (front has more mega pixels) and get a mirror so you can see yourself in the screen. It took me a long time to figure out how to get good photos. I use a lot of natural light so there's certain times that are best for photos. Usually early morning or mid afternoon. Over cast days are always really good for pictures of makeup and such. I always take pictures by a window and with a back ground that doesn't have much going on. Like a curtain background that you can buy, a plain wall, or something outside. You don't want the background to draw attention away from what you want people to focus on. Plus a cluttered background or a busy background looks unprofessional sometimes and a bit too casual and personal. For product pictures, a white background is your best friend.....even if it's just a piece of poster board. Take lots of photos as well. That goes for everything. Not just one or two. You take tons and then go through and see which looks the best. Obviously there are cameras out there that are amazing for this stuff, like Canon and Sony. There's even "selfie" cameras that everyone uses right now, or at least you see a lot of big names using them. They make the best but they are not cheap, however they are an investment. If you're super serious about this then I say invest in one when you can. If you are unsure as to how you'll like it then I'd work at getting great photos with my phone or whatever camera I had and finding the best lighting and background and do that until I decided if I wanted to continue to pursue this path. Fourth: Join programs, platforms, giveaways, campaigns, etc etc : This one is what will get you your exposure, followers, and get your name out there. Being re-posted from a big account especially a company is always great but those don't happen all the time, especially when you're just starting out. Hook up with a loop giveaway if you can, there's usually a certain amount of $$ you have to send in, but if it has awesome stuff in it then that's great. You get followers, you get to have fun, and you get to make someones day. You will lose followers of course but you usually keep about half depending on how big the loop is. Try getting on platforms for "influencers" that connect you to brands. I just googled platforms for "beauty influencers" and started signing up on as many as I could. All the ones I joined were free. Some were an application process, so you had to be accepted and no you won't be accepted to all of them but rejection is part of it. Be as active in your genre's community as you possibly can. Join programs, seminars, mailing lists, newsletters, so on and so forth and engage with your community. You'll find friends and build connections that may help you later on. Besides that, Instagram won't be this big of a deal forever. Fifth: Be as active as you can be on social media. From Instagram, Twitter, Snapchat, and Periscope be as active as possible. I really enjoy Snapchat because it gives you a chance to show people your personality. Which Instagram doesn't really convey. Twitter is easy and quick to answer questions or ask questions or just talk in general, while still being able to upload content and tag companies. Instagram is probably your biggest resource. Like I said before, quality photos people, quality photos, it's a learning curve. I sat down, researched and worked out algorithms for myself. It was just trial and error of the best posting times to get seen by more people, the best hashtag links, what got more likes versus what didn't. It was a year long process that I still work on and tweak because I'm not a professional and I don't want you to think I've got it all figured out because I don't. So I recommend doing that yourself. Research the most used hashtags for different genres, be sure to tag companies in pictures, comments, and also hashtag the company as well. Figure out your best posting times for example: lunch breaks, afternoon when people are home from work, Sunday afternoons, etc etc. It takes time and patience and a lot of work to figure out how to start growing. Sometimes you grow rapidly, then it stops for a few days and then picks back up. It's ever changing. Being consistent though will always help you. Sixth: Don't assume that you "know it all". That's a big mistake, when you think that you've conquered your craft. You'll never full conquer it, you'll just get better at it. There are always new things to learn. Especially in makeup, new trends and tricks are popping up everywhere all the time. Also get out of your comfort zone. No one wants to see the same thing every single day. Yes you may have a week or two or even a month when you don't do anything super creative and that's fine but don't get comfortable there. Step out and try to recreate something, or take pictures in a different way from odd angles or in fun or cool surroundings. Keep yourself open to new things and look to find inspiration in everything you can. One of my biggest pet peeves, as a subscriber to Youtube channels or what have you, is when I see the same natural/neutral makeup EVERY. SINGLE. TIME. There's nothing wrong with that makeup, I love that makeup, but I'm not going to watch those videos or check out that post because it's not new content for that person or that account no matter how good it was executed, it holds no interest for me. Seventh: Work with ALL brands. Including "indie" brands. Especially "indie brands". You will find some hidden gems in the makeup world AND you'll have better shots at being "re-posted" possibly by them. I'm not saying buy things that aren't FDA approved or anything, I'm just saying smaller brands see more than big brands do because they don't have as many people tagging them usually. So that's pretty much the jist. Guidance (whether from a higher power or something else), research, consistency in posting, and quality content, those are the best tips I can give and those are things that I've seen results from. I hope this was helpful and didn't sound like I "knew it all" or anything. I'm just telling you what works for me. Good luck!!   So being in and out of the hospital quite a bit makes me have a makeup bag to go almost always. A lot of times for travel I use deluxe samples or travel size stuff to take up less room. This is why I'm so adamant about always using promo codes to get free deluxe samples of things from Sephora and Ulta. Even if you don't know if you'll use it, there's no harm in trying it. This is going to be cut and dried kids. Just literally the essentials. Brushes Real Techniques Expert Face Brush Real Techniques Setting Brush Powder Brush Angled blush brush Blending brush for face Crease Brush (Morphe 441 or Sigma E25) Pencil Brush (Serenity + Scott travel size Large Crease Brush (Morphe E27) Makeup I usually just take a BB Cream. My pick is Dr. Jart+ BB Cream (I use this because it's not too much hassle and easier on your skin than foundations) Makeup Forever HD pressed powder travel size (for setting the under eye and the rest of the face) Benefit Hoola Bronzer ( I use this for bronzer/contour and as a crease color to define the eye socket some I use the Anastasia quad palette that is interchangeable and pick 4 shadows to take with me usually all matte. Or I take the Kat Von D Shade Light quad palette in Rust but it's bulkier. Benefit Gimme Brow Volumiizing Fiber Gel in Dark (to lightly fill in and give brows some shape) Liquid Liner (sometimes I use this sometimes I don't but you can't go wrong with winged liner. You look more pulled together with it even when you're doing very little) L'Oreal Voluminous Carbon Black Mascara Urban Decay Naked Skin Weightless Concealer Sephora Collection Bright Future Corrector in Peach (I can't not have peach correctors with me) Bobbi Brown Face Base (awesome moisturizer) For Skin Care Kiehl's line reducing eye brightening concentrate eye cream (again awesome) Makeup Wipes (I'm using Burt Bee's Cucumber and Sage right now) Fresh Soy Face Cleanser, or Origins Checks and Balances Frothy Face Wash ( I prefer Fresh though because it's easier to pack) Glam Glow Thirsty Mud as my night moisturizer and it's also like a sleeping facial Kiehl's Midnight Recovery Eye Concentrate as my night eye cream Burts Bees lip balm in squeeze tube. Most every skin care item I take in in a squeeze tube so that they fit into my makeup bag easier. Which makes traveling easier and less messy. That's pretty much it. When I look at it, it seems like a lot. 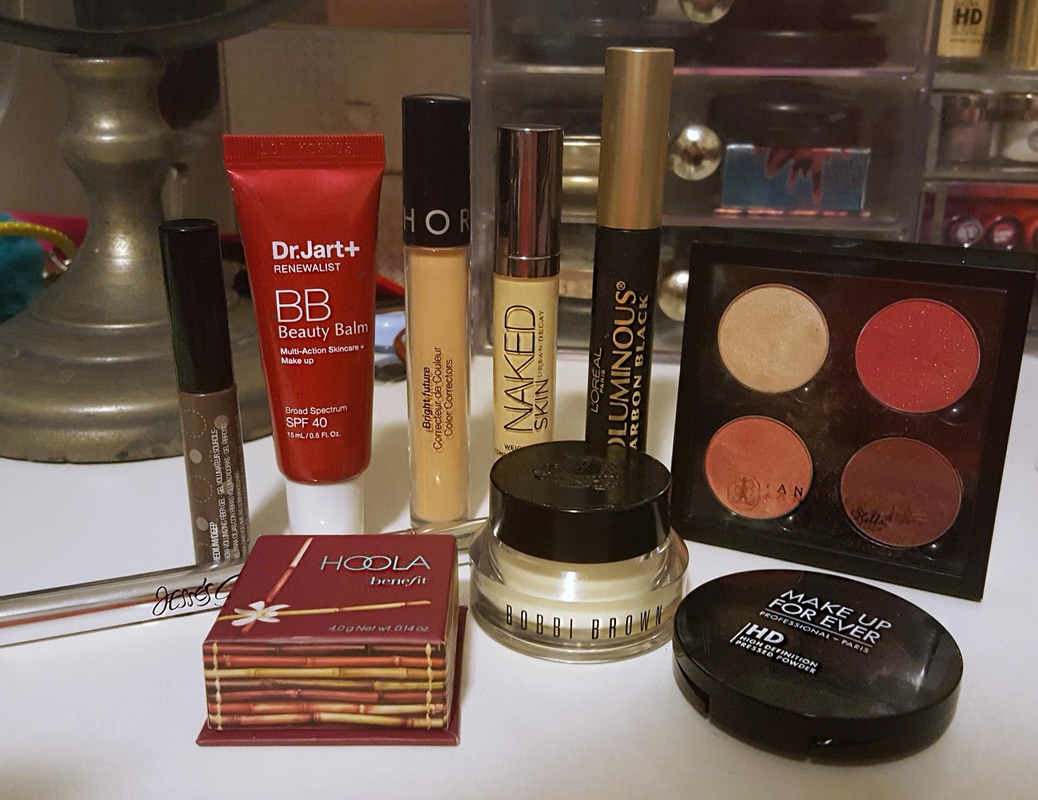 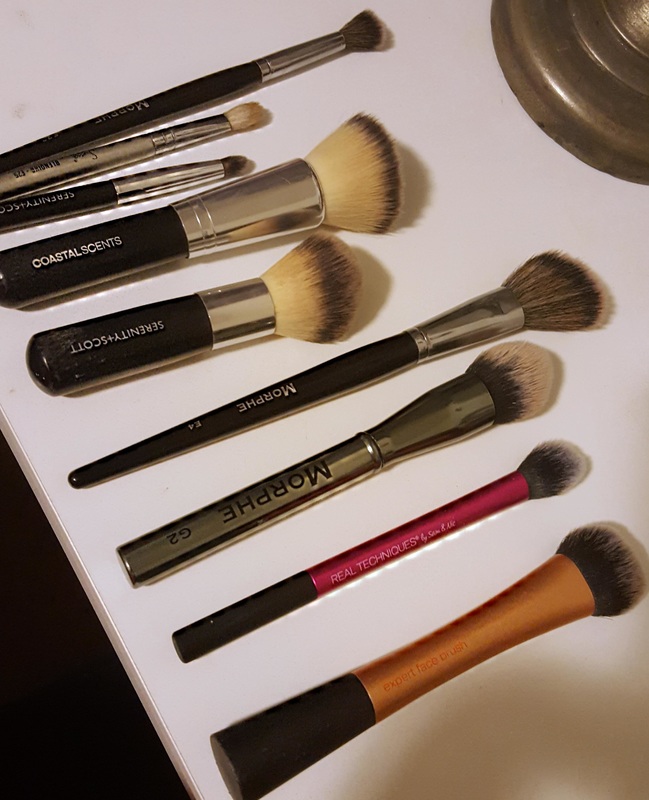 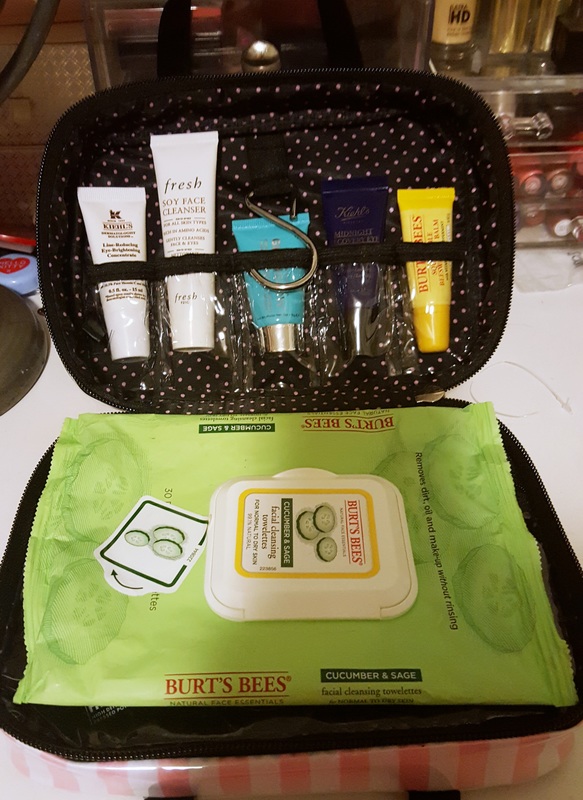 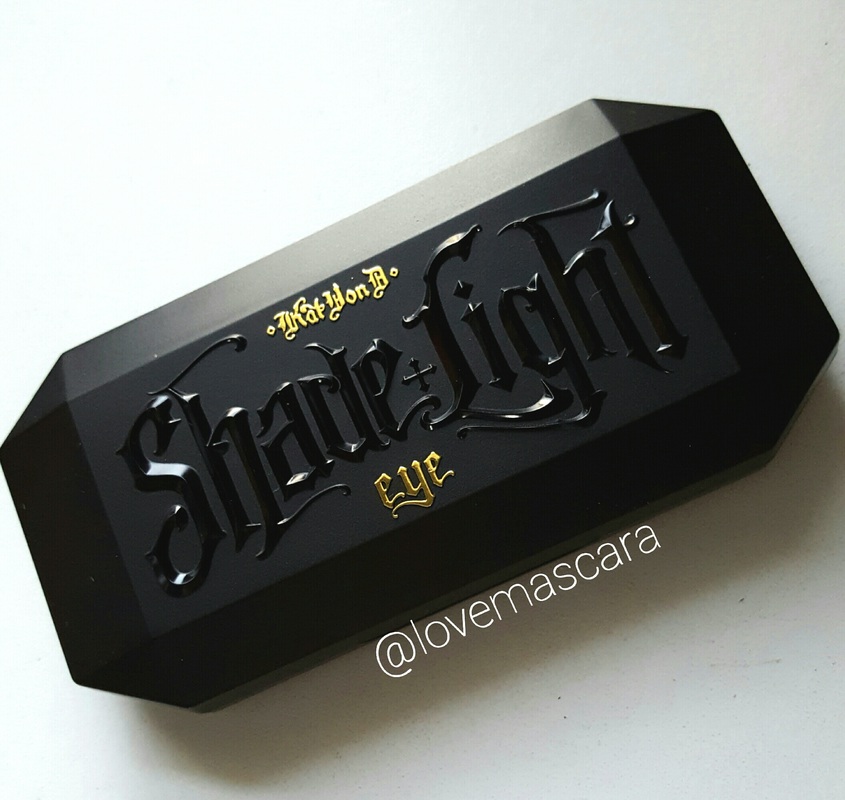 This past week was the Sephora VIB sale and we also hit 225,000 total views! (insert cheers and applause) They have 2 sales a year and November is the big one but this one is always nice too. Instead of 20% off it's 15% off for VIB Rouge and then 10% of for VIB and Beauty Insiders, I think. November is the Friends and Family event and it's 20% off for pretty much everyone. So I picked up, surprisingly, not very much. There wasn't much I needed or was interested in, even though companies were dropping new products and lines every day. The one thing I knew I wanted to try though was the Contour Quads from Kat Von D. There are 4 quad options and they are $26. That's actually a really good price in my opinion, especially since Kat Von usually has such great formulas. Plus her Shade+Light Eye Contour palette, which is all matte or mostly matte, was a huge hit so I was really excited for this. I was going to do a Sephora haul first and show all the things I got but I actually am still waiting on a couple things. Plus, I wanted to try more of the stuff I got from the sale so I could give you a bit of a first impression /mini review before posting about them. The packaging as always is adorable. It's a coffin style compact and that's just so true to the line. It's not very heavy, it's actually quite light as far as weight goes so it may feel a little cheap or less sturdy but none the less I love it and would still travel with it. It's not super sleek like a small z palette, the Make Up Forever metal quad palette, or the ABH quad you get when you order 4 shadows, which I seen on UIta they're offering the ABH empty quads for $10 which is a good deal. So it could seem bulky and perhaps it is somewhat, but it's still a good size. It's pretty much the size, length wise, of an iPhone. 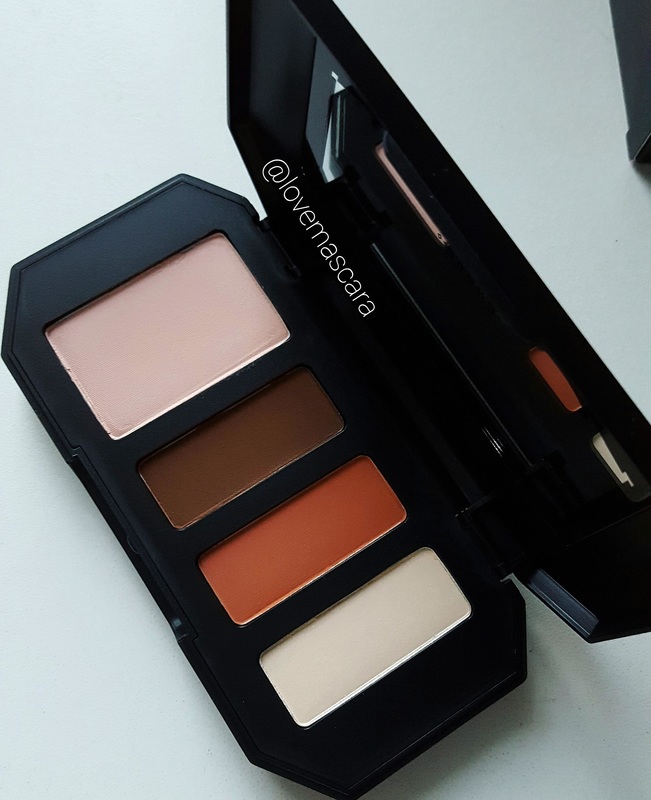 So I got the quad "Rust". From the name you can probably tell it's gonna be very orangey and warm palette and it is. It has 4 matte shades in it. 1 larger shade being the "base" for the eye and other shade to contour and highlight the eye socket and brow bone. The smaller shades are still standard size from her other palettes so you still get a normal sized shadows. I got Rust because I knew I would use it and it would be easy for me to travel with and they're my "go to" colors. The quads are: Sage: which is a green pop of color and the some yellow based ivorys and a grayish beige Plum: which is matte plum shades with a bright purple, muted mauve/plum, and white Smoke: which is matte cool grays. A grey base, black, blueish grey and white. Rust: which is matte brownish reds, with a peach base, neutral/wamrer dark brown, orange/rust, and ivory These quads are getting some mixed reviews, I know the Sage quad, I've heard, is a little difficult to get your pigment to stay on or vibrant and I understand how that could be because these are so INSANELY pigmented and soft they almost don't adhere to the lid or primer because they can be moved and dusted off easily or they almost melt right in to the skin. I HAVEN'T HAD THAT ISSUE THOUGH WITH MINE. I'm just saying that I understand how that is possible and what people are saying makes sense because I've had that happen with other products. Like I said though, I've not had that issue with my quad.  These are the swatches from the quad and automatically you see that excess dust. I had some people ask if they were chalky. No they aren't, they're very soft. I swatched them kinda hard with my finger but also like I said they're so soft that you pick up so much excess powder, which can be both good and bad. So they're all super pigmented of course, the only one that would be dry, if at all, would be the dark brown. It was not as soft as the other shades especially the light shades but that's fine with me because it's not a lot of fall out of dark brown and it blends just fine. It seems similar to Mocha or maybe Americano from Makeup Geek. I'm not entirely sure though I'd need to see them side by side and I don't have them with me at the moment. The base shade which is the peach shade is a pretty similar color to Peach Smoothie from Makeup Geek which is my favorite blending/transition color. The lightest shade is similar to Foxy from Urban Decay which is my favorite brow bone highlight.
The orange/rust shade is just fantastic and I don't really have anything like it in a matte finish. I didn't notice much fall out from it either to tell you the truth. This is also super pigmented, if you know me you know I love Poppy from Makeup Geek but this is a bit more muddy and I LIVE FOR THIS SHADE. Poppy is definitely brighter and a pop of color while this is more wearable and just insanely warm and like a clay mud type color. It's basically what sold me. I love an orange in the crease as you know. It balances out so many looks for me by having a warm crease (not insanely bright crease just warm) and then having like a blue, purple, green or whatever color on the lid. It's so awesome and it doesn't sound like something you would pair off together but just try it, warm crease and a cool based lid. I recommend trying a purple lid and an warm pale orange or coral in the crease and see how you like it because it's so pretty. Of course this also makes a banging warm smokey eye. I also love using the rust shade as a base for the lower lash line, just really blowing it out and making it super smokey bringing it down lower than normal and then using the dark brown over top or just leaving it as is. I even like working a black lid up to a brown crease and then have a orangey brown upper crease as a gradient effect and a super smokey eye that incorporates black but not gray's really and keeps you from looking punched or bruised. So that's my thoughts if you wanted to try something from Kat Von but weren't sure if you'd like it, try these. You can add shimmers to it from other palettes or what not but still get a feel for the formula and shades before going all in and buying one of the bigger palettes. They usually are in the mid $40 range. Of course you can return anything you aren't please with to Sephora as always. They have a very nice return policy. I'll leave the link for it here. If you're going to shop online then use Ebates and get some cash back for your purchases. I believe by just signing up for Ebates you get a gift card or something but I'm not 100% sure. Also look for promo codes that way you can get some extra samples with your order for free. Here's a few that I know of: 9 piece fragrance bag (2 choices of bags) "SCENTME" Bare Minerals Face Trio "BARESERUM" Deluxe Lip Gloss "GETGLOSSY" Dr Brandt Needles No More Mask "NNMMASK" Smashbox XRated Mini Mascara "XRATEDLASH" 7 packets of the Fresh Black Tea Firming Overnight Mask "OVERNIGHT" **the codes usually have to have no less than a $25 purchase and some have to have a $35. I think all of these were $25 purchases though. You can always use the code "YOURGIFT" as well and see what they have in the Mystery Gifts. Codes go in the "promotional code" box, so you can still use a promo code, redeem points and choose 3 samples at checkout if you want. If it's your birthday month then you can also throw that in there too. I hope this was helpful in some way and happy shopping! |
ErinI'm from Tennessee. I'm a makeup and skincare lover. I have always enjoyed creating looks but I love to help people with product knowledge and application even more. I've been able to start blogging and do these things I love because God has seen fit to bless me with the opportunity. Thanks for stopping by and visiting with me! 

 
Categories
All
Archives
January 2022
|
 RSS Feed