 So, I know that people have been re-creating Snapchat filters as makeup some. Nikki Tutorials has done some, I seen in Glamour where a whole fashion show used Snapchat Filters as their makeup inspiration. I thought it was so cool, and even though I'd done a few in the past I really wanted to step it up though for Halloween. Mainly because, these would be so cool for a group of friends to do for a party or maybe an at work theme for you and your co-workers to do for Halloween if you get to dress up. A lot of them are really easy to do. So I wanted to do this, then I asked my friends to let me make them into some filters as well, and then I tagged some of my makeup friends to try it too.
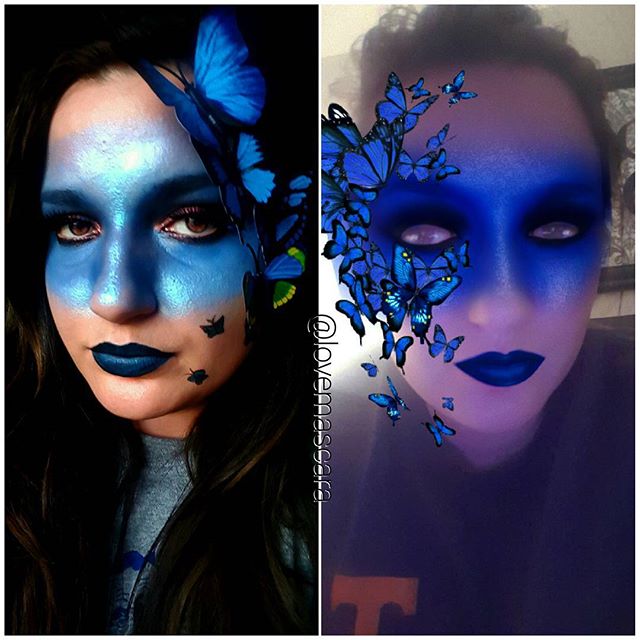
So I'm just gonna start with the actual ones I done for Halloween, not the ones I had done previously. My first one was the Blue Butterfly mask filter. I actually went a little extra though and bought some blue butterflies to stick on my face. Which made this super easy. Plus they were super inexpensive, I got them off ebay. So for the blue mask. It was so easy and you didn't have to be really careful and detailed with it. I used Ben Nye cream paint in blue with a regular wedge sponge and applied it all over the face as the base. Then I set it with Neptune shadow from Makeup Geek. The mask also has a super highlighted and shiny look. so I used a few different duo chromes. Starting with the Milk Makeup Holographic Stick which is a duo chrome it self. I went over it with Makeup Geek duo chromes in Sugar Rush that has a teal duo chrome, and then Black Light duo chrome that has a purple-y blue duo chrome. I mainly went around the edges and then down the nose with this. Around the eyes is super smokey with black shadow. Not precise at all. Just very blown out. I actually already had a shadow on so mine doesn't look as black as I wanted but I did use Corrupt from Makeup Geek over top of it. Plus, I added lashes. I didn't even worry that much about brows. I kinda defined them some just so they wouldn't get lost but I didn't sculpt them. Next up, I used Tarred black lip liner from OCC to darken the the outer parts of the lip. The only blue lip color I had was Bondi Beach from Ofra which is a bit brighter of a blue. So I needed a darker lip liner to make this work. However, if you have Echo from KVD that would be perfect. I used Ardency Inn Punker Liner for the two little butterflies that I drew myself. Use my code "LOVEMASCARA" for $$ off your purchase if you want to. Then I just glued on the butterflies for the final 3d effect. This was super easy. I love messy looks that don't require a lot of thought, or precision with them because it's very hard to mess those up. You could use blue paint from Walmart Halloween section even. I get my Ben Nye paints from Frends Beauty because they offer so much for SFX, not just Ben Nye. They have Mehron, Kryolan, Temptu, etc. So depending on how much you want to invest you could get a few colors, a color wheel or even entire palettes. Sign up for their free membership and you get 10% off your purchases. So stay tuned for more Snapchat Filter Makeup and if you re-create any then feel free to tag me because I'd love to see it! My Instagram is @lovemascara and my Snapchat is: loveandmascara follow me on there as well, I do a lot of tutorials and mini reviews. I hope to see you try some of these and keep an eye out as I add to the series through out the month.
0 Comments
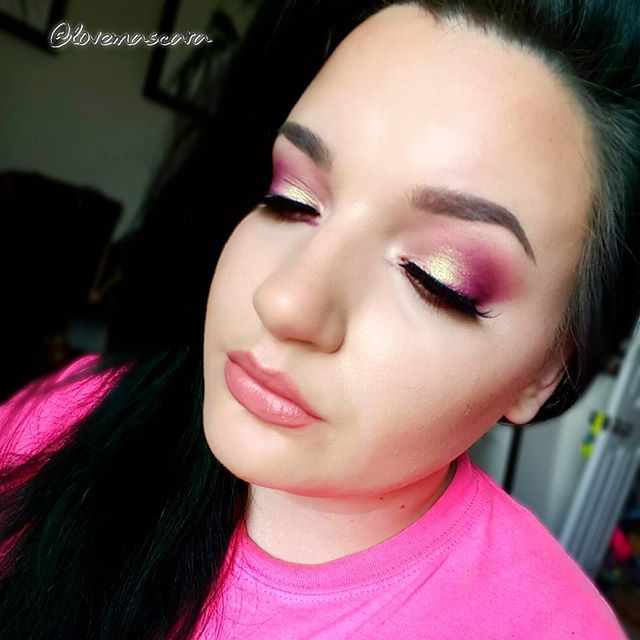 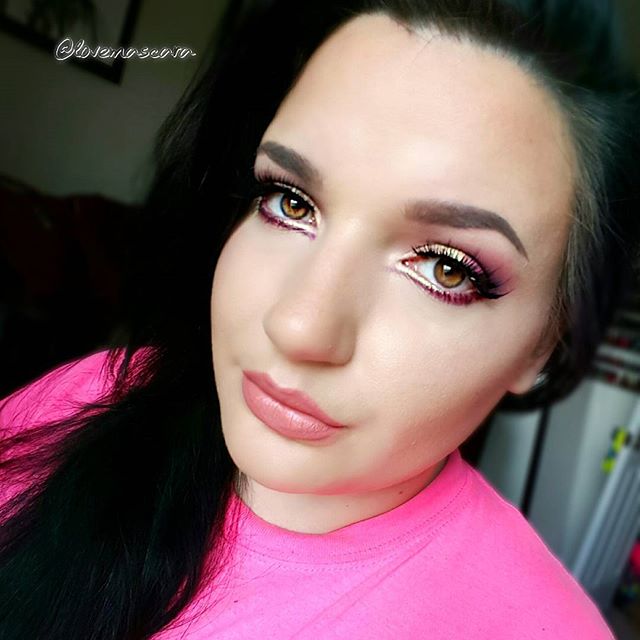 Summer has arrived. It's in full swing here in Tennessee. So naturally I'm sporting some colorful, down right neon looks to welcome it. Starting with the one above. Strawberry Lemonade (all Makeup Geek shadows): Crease: Tuscan Sun first and the Poppy Lid: white base, outer half is Fashion Addict taking it into the crease as well. Touching up the crease again with Poppy. Then Hologram Pigment on a flat stiff damp brush on the inner 2/3rds of the eye. Lower Lashline: With a pencil brush the outer half is Poppy first and then Fashion Addict. Then with an angled brush I'm using Fashion Addict to trace the bottom of my tear duct. Not connecting it with the lid. Then applying Hologram with the same angled brush only wet. Angled brush needs to be thin so that the pink doesn't go too far down and make you look sick. Lips: Bare With Me from Dose of Colors I'll leave a video for it here. 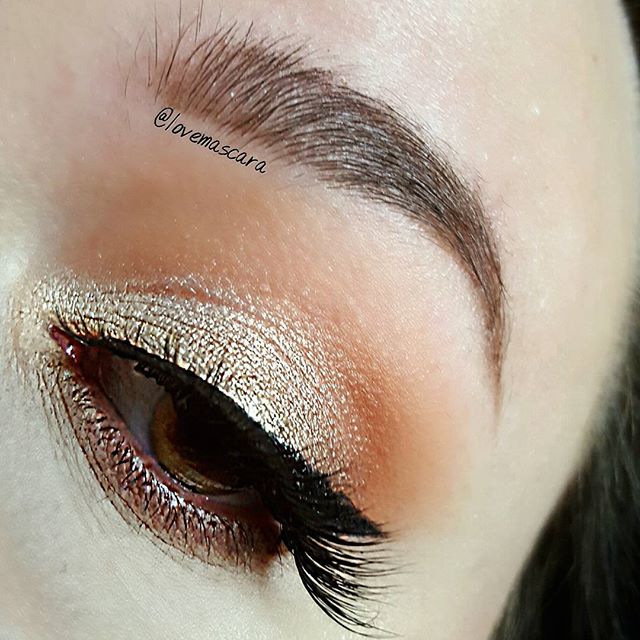 This one I'm calling "Cantaloupe" All MUG shadows again Crease: Tuscan Sun and Chickadee Lid: Voltage over In The Spotlight. Americano on the outer V Then Light Year Sparkler applied with a glitter glue base. Liner: Ardency Inn Punker liquid liner Lower Lashline: Tuscan Sun and Voltage Link for the video is here. 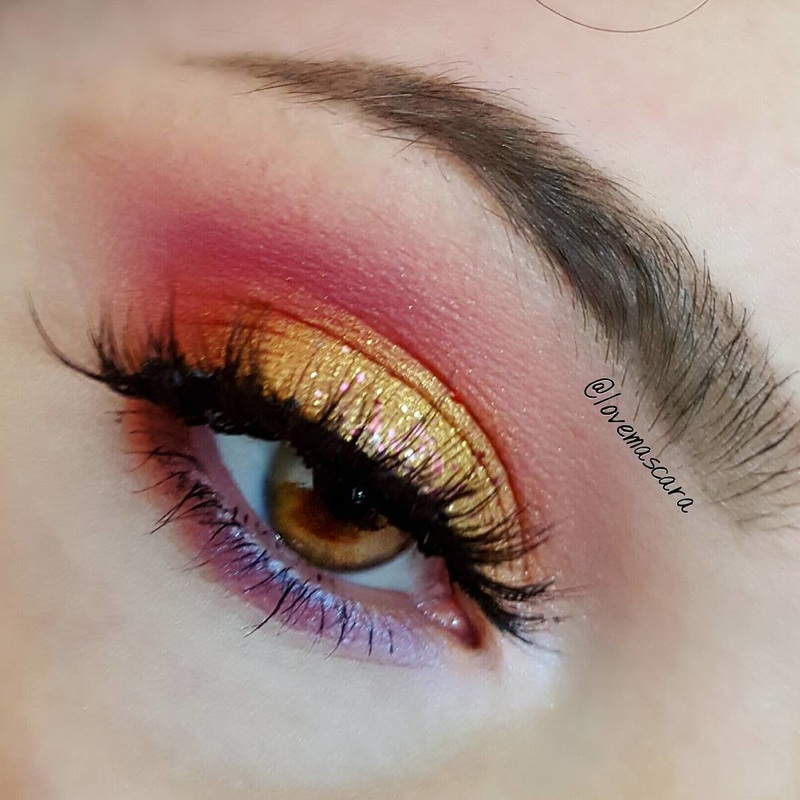 This one I like to call "Fruit Salad" for it's array of colors. It has more colors to it than the others. All Makeup Geek of course except the glitter. Crease: Tuscan Sun, Fashion Addict, Poppy Lid: Fortune Teller and Mai Tai. 24k Roseate glitter from Star Crushed Minerals. Lower Lashline: Poppy and Black Light on the inner half for the purple cast Lashes: Vamptress lashes from Violet Voss Video for this one is here. 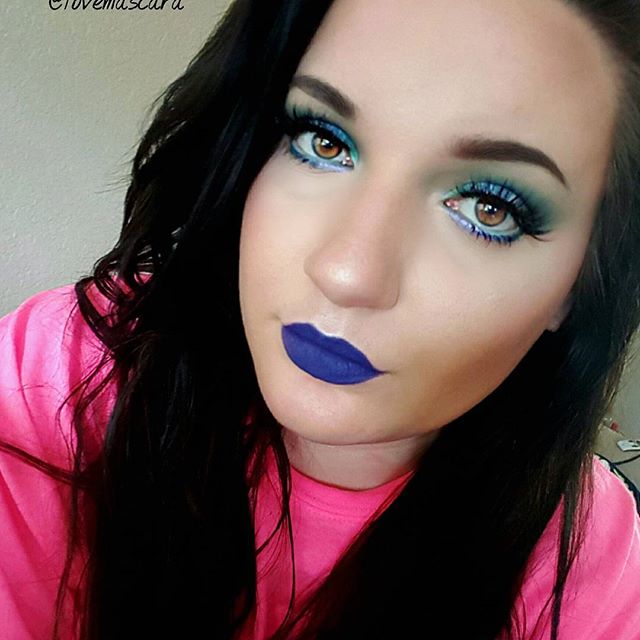 This look is more bold and intense. The lip option can easily change though. There is no video for this one. All the shadows are Makeup Geek as well. I call it "Blue Hawaiian Cocktail"
Crease: Dragon Fly and Sharkbait Lid: Dragon Fly on the inner corner, Chit Chat in the center, and Houdini on the outer lid Lower Lashline: Chit Chat on the inner part, Sharkbait on the outer part Lashes: Vamptress lashes from Violet Voss Lips: Climax Matte X lippie stix from Colour Pop. 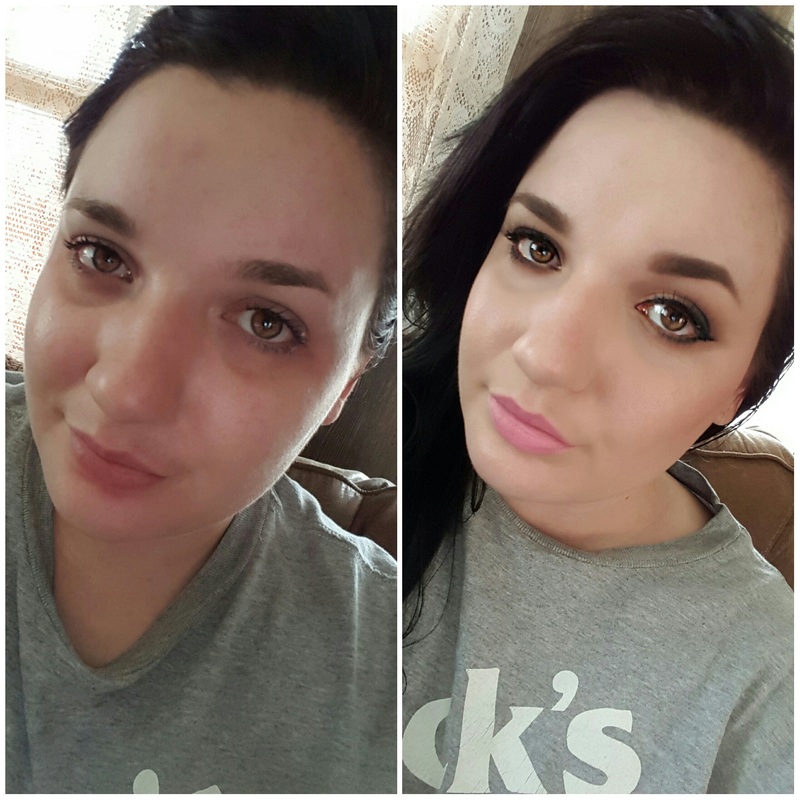 My friend Melissa, who is a Beauty Vlogger on Youtube, and I were discussing negative comments we get about our makeup and one thing led to another and we decided to do this Dollar Store Challenge. Not only is it fun but it is a CHALLENGE. We basically wanted to know if it takes mainly good skills to apply makeup, good products that do all the work or about half and half. Plus not everyone has tons of money to spend on Sephora or even drugstore (ie: Walgreens) makeup these days. So going as low as we could we decided to try out this challenge at our own dollar stores to see what we could find and how we were gonna make it work from application like brushes, sponges, etc to actual makeup, and for me even correctors. So we had to get creative. Here is Melissa's video: *FAIL* Dollar Tree Makeup Look Her Instagram: @melissa.juliet Her Snapchat: @melissa.juliet 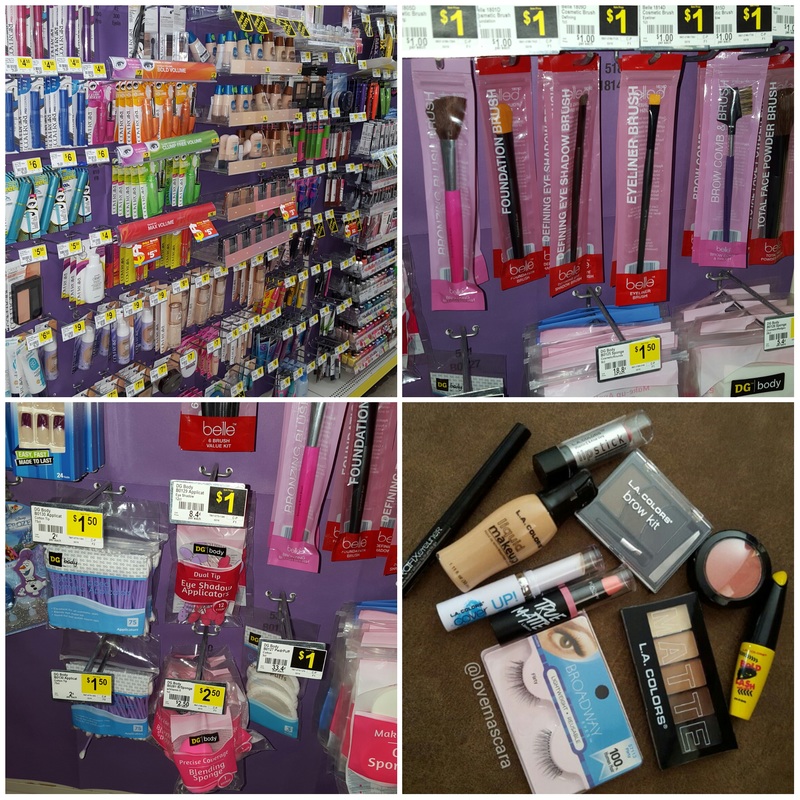 This is my local dollar store. It actually has quite a large makeup section but staying true to the task I went for the lowest price possible which was LA Colors. So basically everything I got was LA Colors and 2 things I think were Broadway Colors or something. The brushes were also $1 I only found two and there was no blending brushes, also got a Beauty Sponge. So I got: L.A Colors Graphixeyeliner in black L.A Colors Brow Kit in Medium L.A Colors Liquid Makeup in Buff L.A Colors Cover Up Pro Concealer Stick L.A Colors Matte palette in Brown Tweed L.A Colors mascara in Bold Lash L.A Colors blush in Natural L.A Colors lipstick in Dream Broadway Colors True Matte lipstick in Pink Drop Broadway Eyes lashes in Flirty Beauty Sponge Liner Brush Shader Brush Total Spent $26 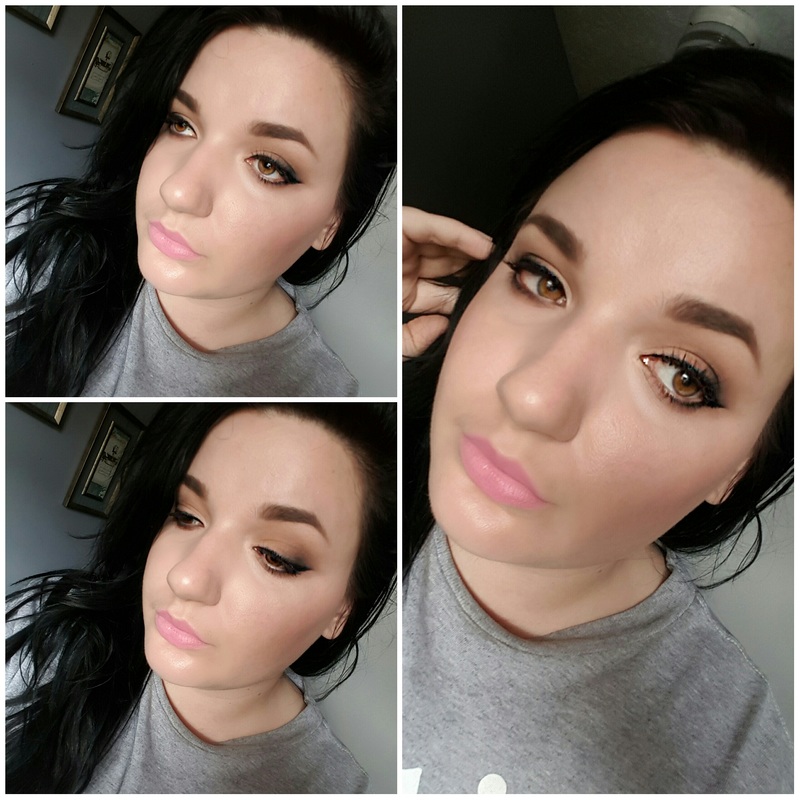 So first off, I needed some type of corrector for my dark circles. So I used the lipstick in Dream, which is a pinky peach, under the eyes. I applied it very very lightly. It was a bit too bright but it worked. Next up I added a layer of concealer under the eyes, and in the T Zone so that the center of the face would have some highlight. Then I used the foundation. The foundation didn't have good coverage it was like a sheer, possible medium coverage so I had to add more concealer on afterwards to get about a medium coverage.
Next up I used the Ivory powder in the Matte eye palette to set the under eye area with the shade brush. Very very lightly. It didn't have a ton of pigment so it worked fine for setting everything under the eye. Moving onto blush this was a disaster. The brush it came with was terrible naturally and the blush itself had lots of sparkle in it. Maybe using a real blush brush would've done better but I AM COMMITTED. So I applied wayyyyy too much and then had to buff it out with the sponge. I tried using the eye shadow to contour some but it didn't hardly work out, it mainly just buffed completely away. For the eyes I used Matte shadow palette and just basically accomplished a smokey warm eye with a very smoked out liner. Speaking of liner I used the liquid liner and it was not easy. It was such a stiff applicator and dried so quickly that is was nearly impossible to make a clean wing. Therefore, I had to smoke it out which I liked better. I used the eyeliner straight brush to apply black shadow to the wing and help make the look more pulled together instead of a mess. I also used it smoke out the lower lash line as well. Then I used the mascara which seemed to work pretty well. I applied the Broadway Flirty lashes and I LOVE these. They're the perfect size for a natural look, not too long and fits the eye perfectly. I just lay them down in the center. You can hardly see them but I love that, they look like your lashes but better and you don't even feel them. Next for brows. I used the little brow kit that came with tweezers and a mini angled brush. It has three colors all cool toned browns from medium, dark, to black. I used the middle shade the dark brown. This actually worked really well. I would prefer one of my regular angle brushes but like I said we're COMMITTED. For lips I used the True Matte lipstick in Pink Drop. It's like a bubblegum pink which I wish I would've chose a different color but too late. This was very opaque and pigmented but it looked a bit dry and clung to dry patches on my lips. I believe it was just $2 if that and for that price I don't mind it looking a tad dry and I may go back and get some other colors. So all in all this was a very challenging and I'm so glad I done it. I'm so glad Melissa asked me to do it with her. Our conclusion is having good products makes a huge difference but so does having good tools. Not all brushes are super expensive either. Just check out Morphe, Crown Brush, or even Coastal Scents and get some basic brushes. Also try a real beauty sponge like the Real Techniques Miracle Sponge. Yes it does take some skill to pull off a flawless look but it takes good tools and at least decent products. Not to say that all these products wee duds. Only two or three of them were. So don't sweat it. If you wanna save some money and get some inexpensive products I do recommend the lipsticks, eyeshadow palettes, even the concealer if you aren't covering tons of blemishes, the lashes I love, and the Brow Kit. Also maybe a mascara when I find one that I really like. Jordana also has nice products for a very low price as well. The sponge I don't care for, nor the eyeliner or blush. So that was my challenge I'm linking some videos on my Instagram of how it went applying these along with some fails: Part 1 here Part 2 here Fails here 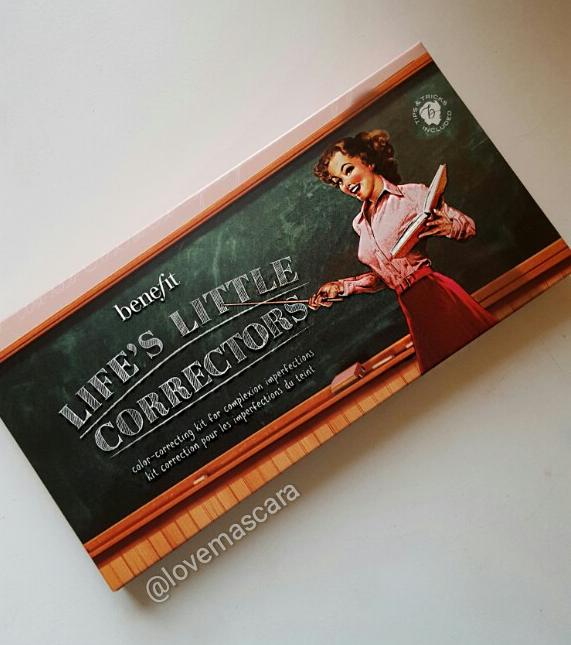 Color correcting is the new trend and while I do think there is a need for color correcting, I don't want everyone to get crazy with it like contouring is. Believe me you don't need much and you usually only need 2 maybe 3 shades at most. So I don't get down with the sets that have every shade under the sun unless you're a freelance artist. However, I really like this set because while it does have correcting qualities they serve different functions. 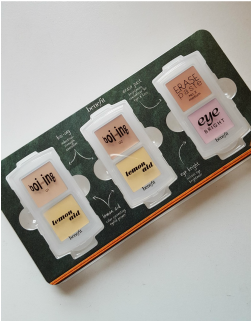 This comes with 2 "Boi-ing" concealer shades in 01 and 02. Two Lemon Aid yellow eye shadow primers that correct redness. An Erase Paste in 02 Medium for dark circles and Eye Bright to brighten up dark areas.
I used the Erase Paste for years, I've always really like Lemon Aid and Eye Bright as well. This is a cool set for a freelance kit it's very compact when the little containers come out. I really enjoy this. I done a little demo of this showing how I'd use the Erase Paste, Eye Bright, and Lemon Aid. Now on a normal day I would probably just use Erase Paste and maybe the Lemon Aid primer if my eyelids were really red. Today my whole face was red though so I used it as well. I'll link that demo here. This is pretty cut and dried you get two actual concealers for blemishes, two eyelid primers that are the same, and a dark circle corrector in peach and brightener in pink. This goes for $20 at Sephora which is a great deal, it's also limited edition as well. I'll go through the Erase Paste fastest because it's super creamy thus easier to get more product out. The rest is more dry creams so you're not accidentally getting out more than you need. I find that the darker shade of Boi-Ing concealer is a bit too pink for my taste. That's not a deal breaker though especially for the price. Remember if you're going to to get this then use Ebates and get you some cash back when you shop. Link for Ebates is in the side bar. 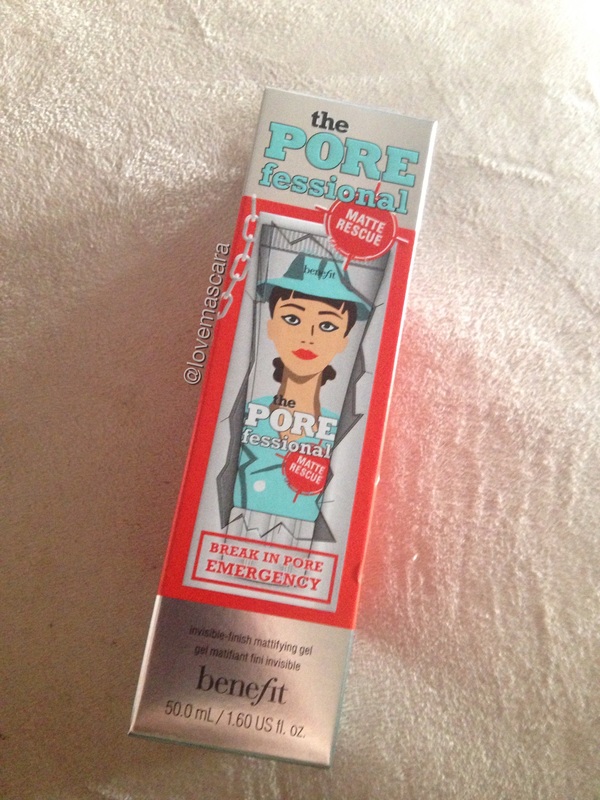 Benefit has released a new "Porefessional", don't worry the original is still available as the two are very different and made to work with one another. This one being a mattifying gel and the original being a "primer". You are to apply the Matte Rescue before primer. This is water based which I really like. I don't care for the original Porefessional (primer) it just didn't help pro long my foundation and slipped right off my face. This does what it says it will do though. I really do like it. It's great for you oily gals. I think it's a good concept as well to make the skin matte with one product and then use a smoothing/pore filling primer on top for the best application possible for your foundation. I apply it with a brush and not my fingers though because it tends to ball up if I rub it too much. So test it out to see how to best apply it for yourself. The first time was a disaster the other times I got the hang of it. I use it with a smoothing primer or blurring primer not necessarily the Porefessional but things with similar texture. This is $28 for 1.60 oz. at Sephora. The OG Porefessional is .75 oz for $31. You can also buy this at Ulta, they were offering free gifts with a purchase of a Benefit product. I don't know if that offer still stands though, it should tell you if you get a free gift with purchase though. 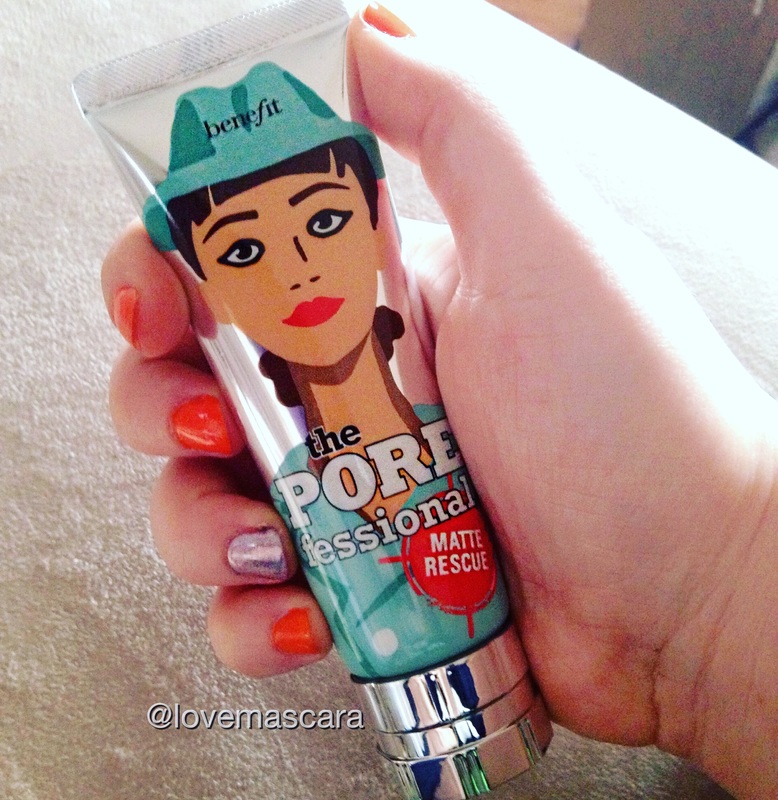
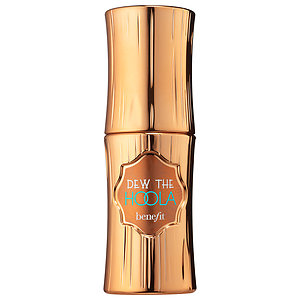
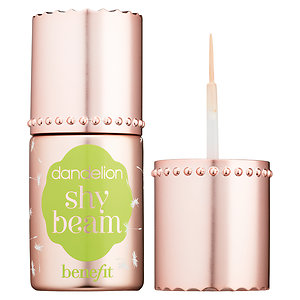
 The swatches above is Dew the Hoola on the left and Shy Beam Dandelion on the right.  So Shy Beam Dandelion is on the top of the cheek bones, center of the nose and forehead. Warm Soul from MAC is the blush, and Dew the Hoola is on the sides of the forehead and areas where I contour or bronze typically like under the blush application and sides of the nose.
If you're interested in getting these from Sephora or Ulta be sure to use Ebates and get you some cash back. 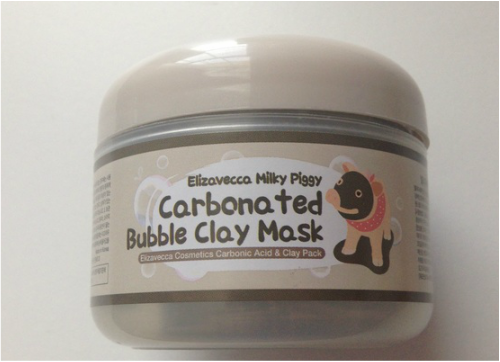 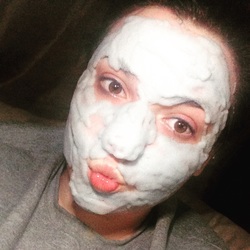 If you've been paying attention to Facebook and other social platforms you've probably seen this new mask demo, which is where I saw it. This is the Elizavecca Milky Piggy Carbonated Bubble Clay Mask. This is some of the Korean skincare we're seeing that's making a huge impact right now in the makeup and skincare community. It's the newest "trend" as of right now, everyone wants some Korean skincare and for good reason. So far everything I've tried has been amazingly good. Sephora right now has a army of Korean skincare. This unfortunately isn't sold at Sephora. This is on Amazon and Ebay, it's on other sites as well but Amazon is where I'm comfortable directing you to. It's around $10.
Ingredients according to Amazon are: "green tea extract, aloe vera leaf extract, matcha powder, charcoal powder, pomegranate extract, fermented soy extract, alantoin, peony root extract, oregano leaf extract, white willow peel extract, portulaca extract, cinnamon extract" The product is around 4 ounces I believe. It's quite a bit of product but you also have to apply quite a bit for it to spread evenly. You are supposed to put this over makeup or an uncleansed face. Wait 5 minutes for it to bubble (feels so strange), it applies grey and bubbles up like crazy. The bubbles act as an exfoliator to the skin. Which is why I love it. It doesn't scrub the face, scratch the skin or have a salty, sugary, residue left over. After the five minutes is up you rub the skin and the bubbles go away and reveal the paste again. Then rinse with "luke warm" water. Now, why I like this is because I had a medicine reaction a couple days prior to using this while I was in the hospital and for some reason it caused my nose to itch like crazy and then the skin started to peel like a bad sunburn. It didn't hurt or burn but it was annoyingly dry, flaky, and itchy. So I used this and it got rid of all that dead skin. Literally there was skin balled up on the washcloth. My skin was super soft. I didn't even apply it over makeup I actually used it on clean skin cause I didn't read the directions right. I've used this about 4-5 times and each time I really like how my skin feels, and my texture issues seem to get better. I will say it bubbles up pretty big so be careful around your eye, if you think your far enough away from the eye then go back even farther. The entire container is in Korean (I assume) so you'll have to go online for directions if mine weren't clear enough, unless you can read the container and in that case....awesome. This is a bit "trendy" and I assume it might fade out soon, BUT that doesn't change the fact that I think it's a really good mask, that's gentle and does a good job at getting rid of dead flaky skin. I will continue to use this because I find it works really well. I have a video demonstrating it here if you'd like to check out how it looks and what it does. 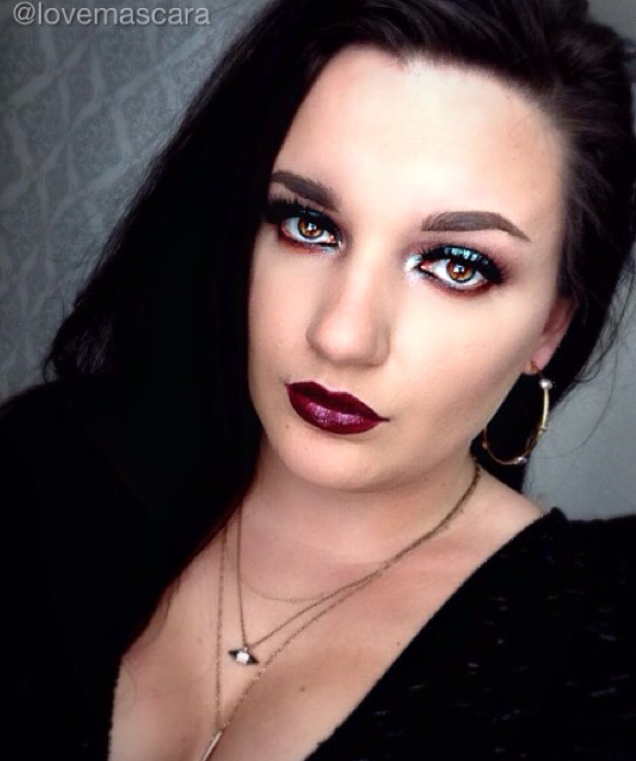 Today I'm going to talk about neutral looks and how you can bring a little something extra to them with a pop of color. Whether that be on the lid it self or with your lip color. So I have three. Two of them I've linked videos to that I done for Instagram. 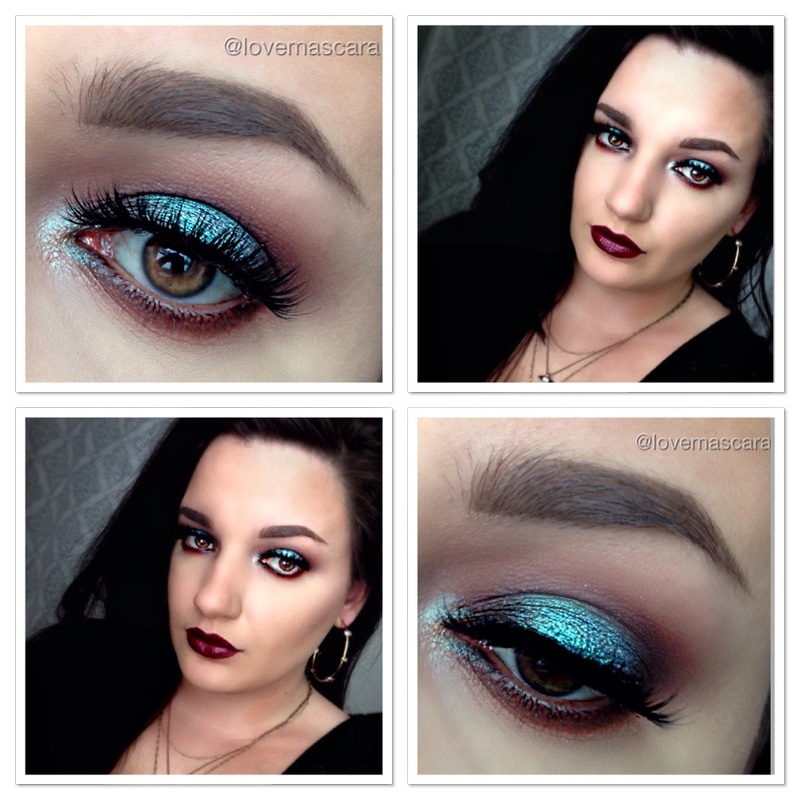 This look above, I actually seen @wickedbeautification on Instagram do with similar colors. I modified it somewhat to my own vision and used different products. Her's is gorgeous so you should check it out for sure, she's so talented. It had more plum/berry shades in it without the inner corner teal part. Mine is a bit more red brown, oranges and a lighter teal somewhat. Here's what I used to do mine:
 This is a more cool toned brown eye (halo again) which when you add pink over it it tends to look a little purple. I try to keep the brown tone as much as possible so I add in warmer tones to cancel out any purple it's trying to bring out. It has some orange on the lower lash line. I have a video for it here which will take you through the whole "halo" technique I use for all halo looks pretty much. Now you could actually add in much more brown to make this even more neutral. I went in hard with the pink so you may want to do less. The Star Powder pigment brings iridescence, it's not necessarily vital to the look though. You could use the pink shades and just go with a darker pink halo eye which is still beautiful. Here's what I used:
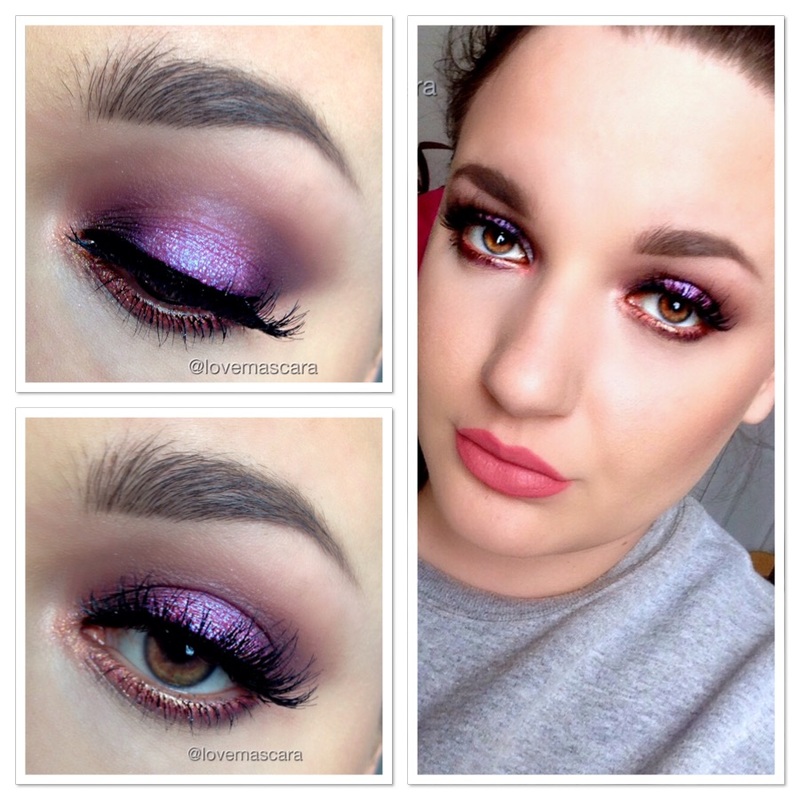
My lipstick is ABH Lovely liquid lipstick. 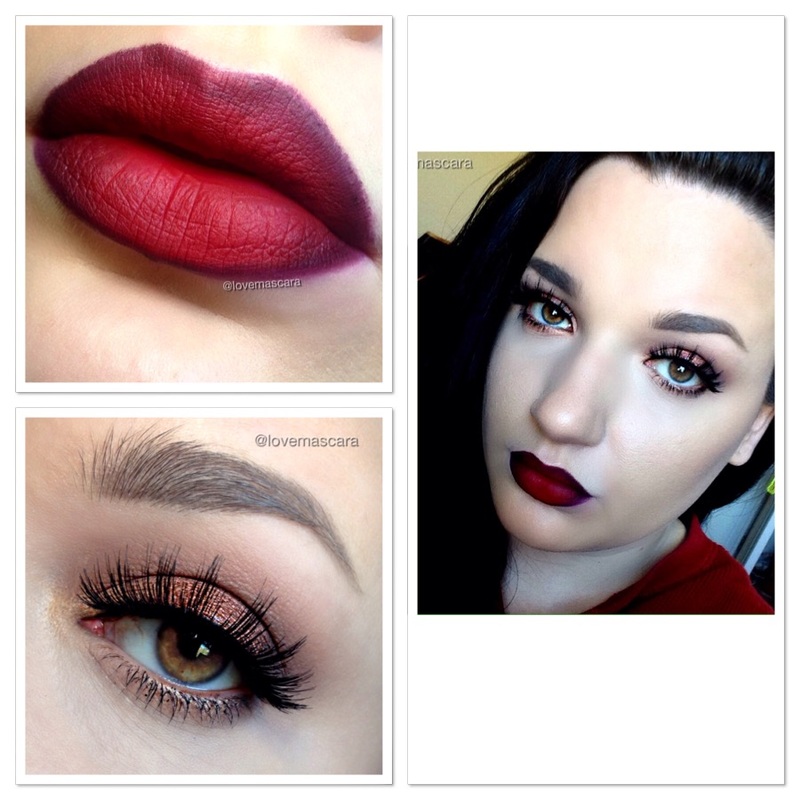 This look I really love because it's a warm neutral smokey eye with an ombre lip that has a bright red center. I have a video on how I done my ombre lip here. The eyes can be modified to what ever you want as well as the lips, I just wanted to include a pop of color that wasn't necessarily on the eye.
Here's what I used:
Lips are Feminist lip liner from Colour Pop and Atlantic City liquid lipstick from Ofra Cosmetics. So those are my latest, and best three examples of easy ways to add in color to your makeup. Whether it be daily, or for a special occasion they all would be suitable. My birthday is Friday so I'm thinking the first one with the teal is going to be my birthday look. If I don't find something I like better. Right now though it's my favorite. Also check out my Instagram (@lovemascara) for small tutorial videos every few days. I'm still working through the lighting and angles though so bear with me, I'm trying to better the quality of them. I'll sign off now and I hope this was helpful, remember to be kind to each other. Spread love not hate. I appreciate you and take care! 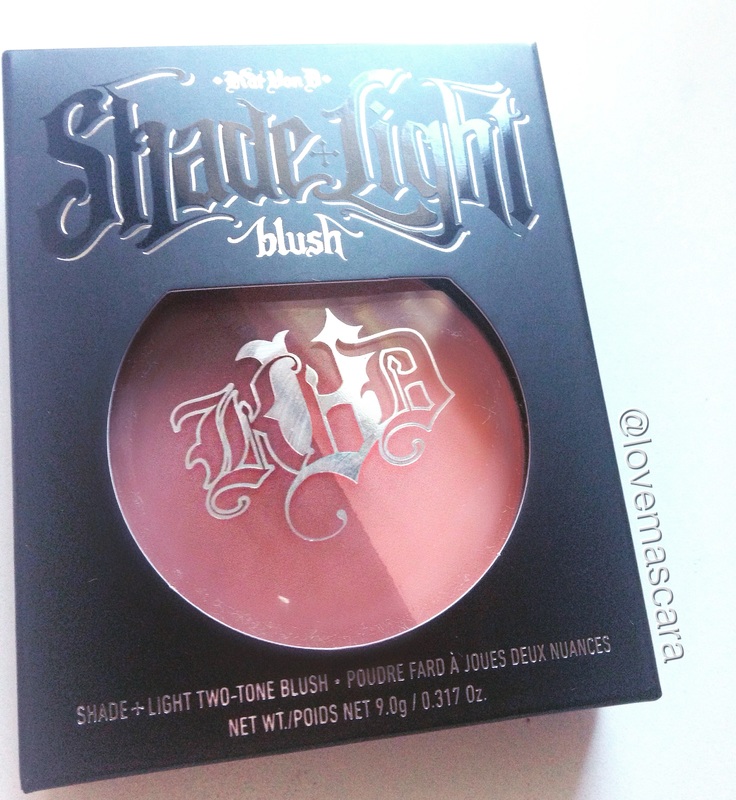 Here we are with another review. I hope you aren't getting tired of them. Then again, this is a makeup blog lol. So today we have the Kat Von D Two Tone blush in Hansel+Gretel. First off, this is only a review of this specific color, as I do not own the rest of the colors and unfortunately sometimes formulas can vary between shades. There are 7 blushes in this line. All of them being matte, and designed to help you sculpt and define your cheekbones along with providing you color. They each have a dark shade and a light shade. It comes with a diagram of three ways you can apply it (according to your face shape) and it was made to work hand in hand with the Shade+Light Contour Palette. So for this shade, I really really like it. I'll be the first to tell you they don't swatch that great on the hand...they apply much better with a brush to the cheeks as you'll see on down. The pan in mine does seem a little wobbly. It's not on the verge of popping out or anything I don't think, but it does move.That has been one of the issues talked about with these. Which I either won't travel with it or I'll depot it and put it in a z palette if I'm determined to have it with me all the live long day. Another thing that I'm seeing people say is that they're "chalky" and "powdery". They do have excess powder when you use them, but so does my Shade+Light palette and everyone loves that so I don't really find that a huge issue. I do not find these dry however, which "chalky" products seem to be. 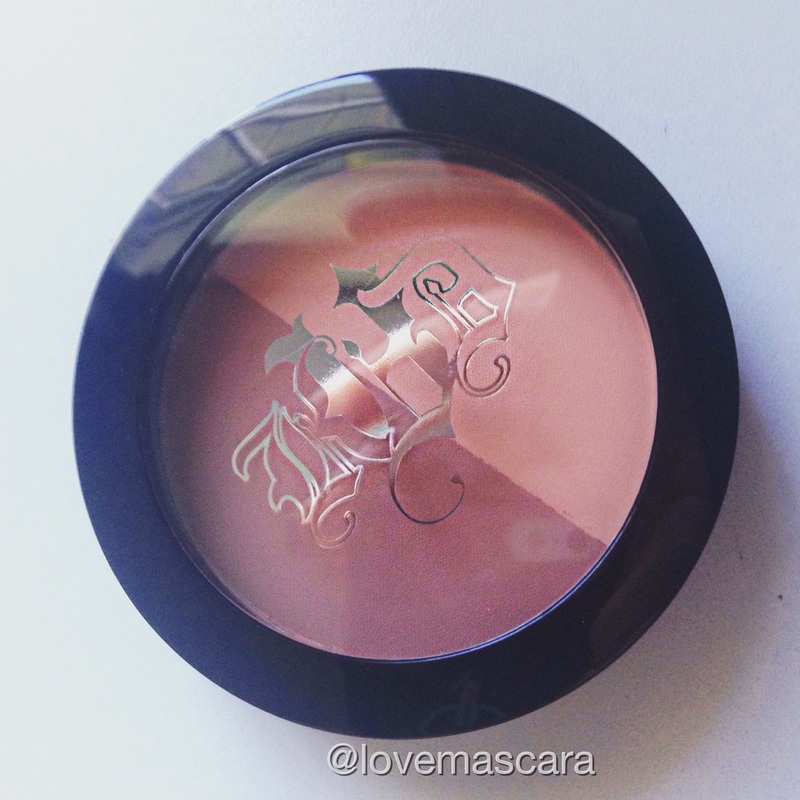 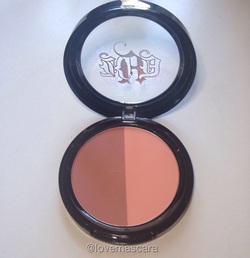 This particular shade is a peachy/apricot shade. The light shade reminds me very much of Makeup Geek Bliss blush and I don't have anything really for the darker shade. I will say that on the skin combined they remind me of Songbird from Becca only without the sheen, because it's a bit darker peach. This is also a lot of product as well. If you only wanted to use one side you could do that with a regular sized blush brush just fine because it's as big as a Becca highlighter. It's 9 grams which is .317 oz for $25. Here is a list of the size of other popular blushes and their price:
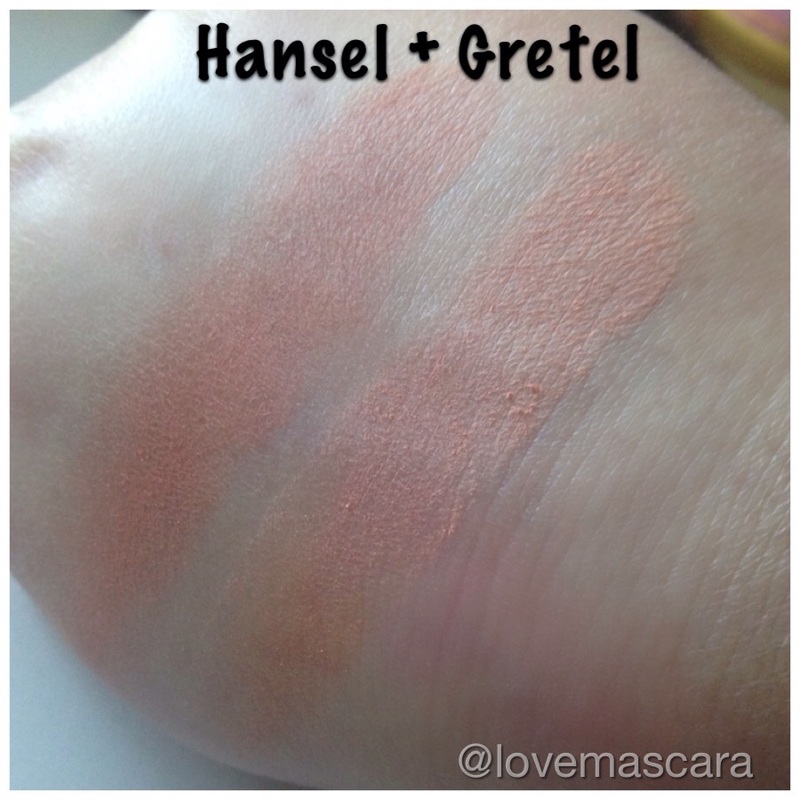 These are the swatches. As you can see they don't look as pigmented and they actually look very similar maybe just a shade difference between the two, when there are really several shades different. Also you can see some extra powder on the swatches because YOU DO GET SOME excess. This formula though is very silky and a bit thin which can be better than all these heavy "cream like" powders like Becca ( I love Becca though). I find these don't emphasize pores as much, and I get down with that. This formula is similar to the Shade+Light palette which would stand to reason because they are made to work together only the Shade Light palette seems to be a bit thicker and more pigmented. My advice is try your best to try this on with a brush and go from there.  This is where I show you how I placed mine. Now you can totally just mix these together and use them as a blush, I wore mine for at least half a day before taking it off and it held up really well. I applied these like the diagram suggested, applying the dark shade near the ear and the lighter shade in front of that. I did use two separate brushes though to apply them to make sure I was getting the right shade in the right place. The last pic (bottom right) is when I added (very lightly) some contour in. So the definition you hopefully can see is mainly from the blush. Also if you happen to not like flat, matte, blushes, I feel like this is a good base for a a similar blush with a different finish you could possibly put over it.  Alright, so final thoughts: I really really like this. I know they're getting mixed reviews so that's why I stress that this shade works really well for me. The pink shades aren't getting amazing reviews but I haven't tried them. They did say that this is build able color. I personally had to buff mine out some what, because I went in a little heavy. It was super easy to blend and apply. I really don't have many negatives about this, certainly nothing substantial enough to make me wish I hadn't purchased this.
I got mine from Sephora. Remember to use Ebates when you order and get you some cash back. *There is also a link on the side bar for it.*  I got to looking around on my site and seen that I had a lot of concealing and highlighting but not as much contouring posts. Which is surprising because I love to contour. The picture above is just bronzer and the rest of my face products on the left side and the right pic is some contour added in. This is a more subtle contour. You can make it more dramatic though. This is also an easy guide to contouring because we're gonna do this backwards a little bit. So this is a faster and easy way to contour if you're a beginner or just don't have a lot of time.  The first 2 pictures are just bronzer, which I apply with a larger face brush and dust around the perimeter of the face. Both pics are showing you where I've placed my bronzer and blush. The bottom left, I'm using a smaller angled brush from Morphe. It's supposed to be a blush brush but I feel like it's too small to do that so I use it for contour. So taking a contour powder that is darker than my bronzer and more cool toned, I just start at the top of the ear and go diagonally toward the lips (not all the way just in that direction). The reason I find this easier is because where the bronzer and blush have already been placed it gives me a bit of a guide to go by. What I mean is, I try to stay under the the blush and not go past the edges of the bronzer. Plus doing it this way means I have to blend less. I usually hit the areas where the bronzer has been placed. So I go up the temples and the sides of the forehead as well if I need to. Keep that in mind, only contour the areas you want smaller. Highlight the areas you want to be more prominent or noticed more. Just like in clothes, darker clothes make you appear slimmer so darker contour makes the face seem smaller or slimmer.  The top pick is the contour placed. You could leave it like this actually if you wanted something very dramatic and just buff the edges underneath a little but I know that some wouldn't be comfortable with that. So to show you how I blend it out and make it more subtle, I use the foundation brush (or sponge) I used for foundation that day and blend the bottom of the bronzer and contour. Then I use the blush brush that applied my blush without anymore product on it and just touch up the areas where I put my blush. After doing those two things you're left with a much more subtle contour that's a little bit more than bronzer but not heavily sculpted. Of course you could do the more traditional way of contouring which would be to contour first but I like doing it last or next to last that way I don't apply too much, get out of hand by putting it everywhere, or look manly by placing it too low on the sides of the face.
Of course this post was only about subtle contouring and not really sculpting the face. I didn't include nose contouring or anything. I can do a post about that as well. I just wanted to show you an easier way (I think) of contouring if it intimidates you, that's also very fast as well. 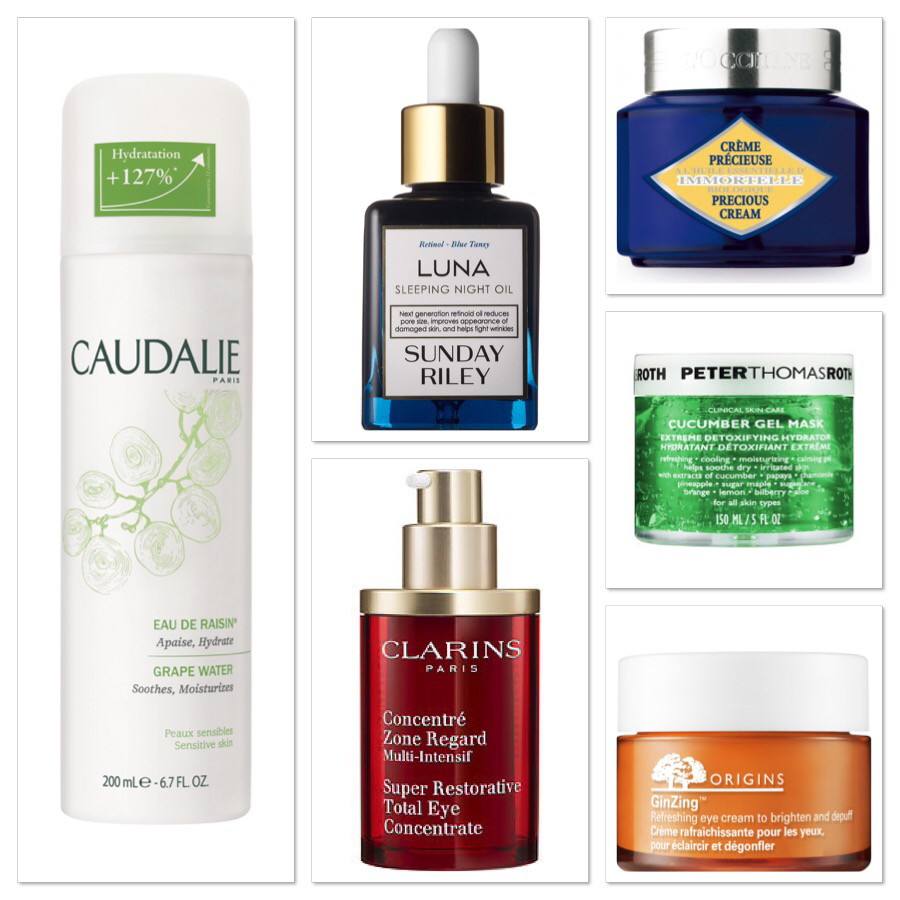 Halloween is over. My skin hurts. I've spent the day trying to get it to stop burning and feeling so dry. So I thought, why not post about what I do in such circumstances.
This is not my everyday routine. This is when my skin needs some help. My normal routine is much more simple. First I spray through out the day with Caudalie Grape Water spray. It's a spray "toner' that soothes and moisturizes skin. It's good for sensitive skin and it is very dewy. It feels so good on the skin. It's probably my most necessary product Next I used a soothing face mask. I used Peter Thomas Roth Cucumber Gel Mask today. I rarely use this but I had ran out of Sephora sheet masks and eye masks and desperately needed something so I used this. I would've rather had a Sephora mask but this works well too. After that I used thick moisturizer. I used L'Occitane Immortelle Precious Cream. It's very thick and feels (and smells) amazing. I used it this morning and at night. For my eyes I used Origins Ginzing Refreshing eye cream this morning. They were looking pretty rough so I used this to depuff and birghten the area it's also kinda thick. Then at night I used a thicker eye cream from Clarins called Super Restorative Eye Concentrate. Lastly I used Sunday Riley Luna Sleeping Oil. I rarely use this because the smell is intense. The reason I do use it thought is because of the Blue Tansy and Chamomille oils in it. They're whole purpose is to soothe. This also has Retinol but the Blue Tansy keeps the skin from getting irritated by it. I used the oil first at night before I spray my toner, or use my moisturizers, since it's a serum. Other than that, I just try to get a good night's sleep and hydrate as much as possibly. Hopefully tomorrow will be better. I do plan on using the Cover FX Calming Primer tomorrow along with a sponge to apply my foundation so that it's not rubbing on the skin. I also won't be using glitter for a little while as well lol. Some of these products are really expensive some other good alternatives are: Argan Oil, Origins Night A Mins moisturizer, Sanitas Oil Free Moisturizer, Aloe Vera gel, Sephora sheet and eye masks ($5) , and Witch Hazel. |
ErinI'm from Tennessee. I'm a makeup and skincare lover. I have always enjoyed creating looks but I love to help people with product knowledge and application even more. I've been able to start blogging and do these things I love because God has seen fit to bless me with the opportunity. Thanks for stopping by and visiting with me! 

 
Categories
All
Archives
January 2022
|
 RSS Feed